1) Get the Account ID for the copier from office staff.
2) Login the Win10 computer using StatNet credential.
3) Select printer name: "Xerox WorkCentre 7855 PS". Also check the checkbox "Print in grayscale (black and white)" to save the color toner.
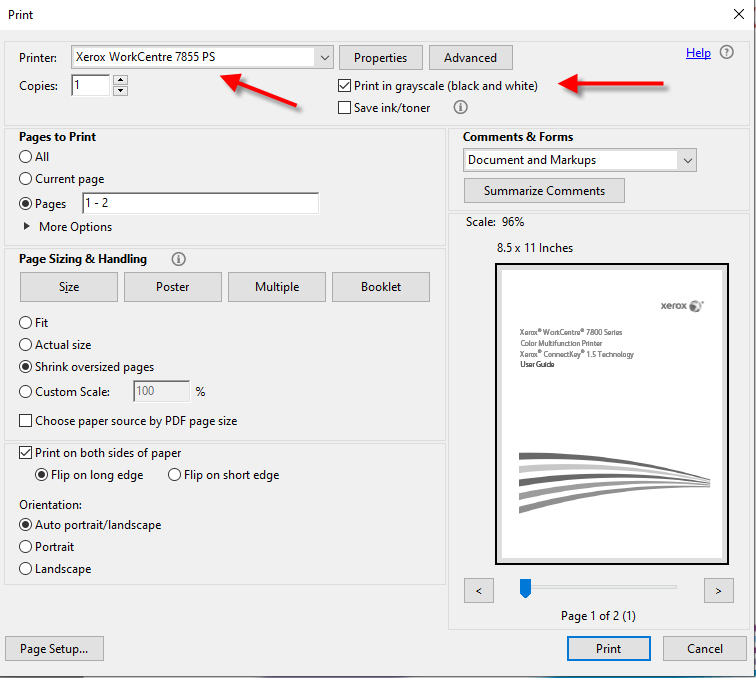
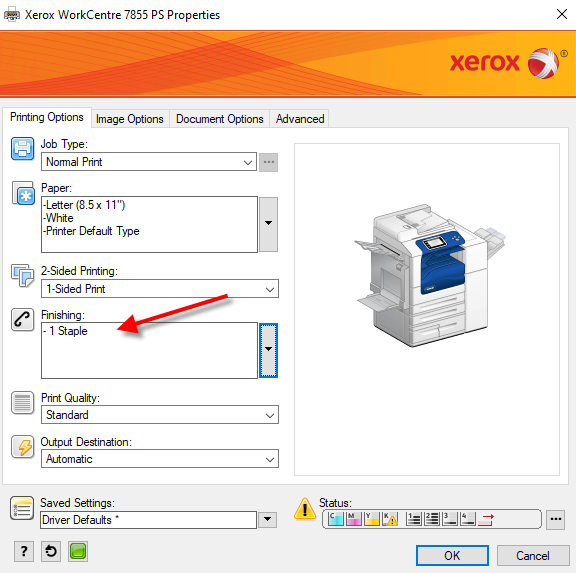
4) Click on button "Properties" you will see the form below. Select the stapling option you want, then click button "OK"
5) Enter the Account ID you get from step 1

Below are ways to get from TeX/LaTeX to a pdf file. These approaches are highly recommended over the use of ps2pdf, which does a bitmap conversion (resulting in a huge pdf file that is not searchable by words).
- Converting latex: pdflatex without graphics
- Converting latex: pdflatex with graphics
- ps2pdf, epstopdf
- Converting dvi to pdf: dvipdfm
Converting latex: pdflatex without graphics
Just run pdflatex.
Converting latex: pdflatex with graphics
To include figures in latex, the "best" approach is with the graphicx package:
   \documentclass{article}
   \usepackage{graphicx}
or
\documentstyle[graphicx]{article}
Then figures are included with something like
   \includegraphics[angle=-90,totalheight=4in]{plot}
   \includegraphics[totalheight=4in]{plot}
   \includegraphics[totalwidth=6in]{plot}
or
   \includegraphics[width=3in, height=4in]{plot}
   \includegraphics[width=7.5cm, height=10cm]{plot}
The use of \totalheight or \totalwidth is preferable in order that text characters are proportional and not squished in one direction.
Just run pdflatex or latex. For the above, pdflatex assumes a file plot.pdf exists, and latex assumes a file plot.ps exists
Converting figures as ps files to pdf: ps2pdf, epstopdf
To convert a figure from postscript (ps file) to pdf, use the ps2pdf command. If this fails, then try epstopdf. This conversion is needed to include graphics for pdflatex. In pdflatex, graphics types allowed are pdf and png, but not ps.
Converting dvi to pdf: dvipdfm
dvipdfm is currently only available on the Linux computers, not the Solaris computers.
dvipdfm converts a dvi file directly to pdf, without changes in the TeX/LaTeX file. The resulting file is searchable. Different graphics type (eg., jpeg, gif) can be used with the graphicx package in LaTeX; these cannot be seen with xdvi but they can be seen from acroread after the dvi file is converted to pdf.
Sometimes dvipdfm works better than pdflatex (e.g., slides using the 'seminar' style).
Another way to add printer is use "Bonjour", IPP or TCP/IP printer.
TCP/IP method:
Name: hp5.stat.ubc.ca
IP: 142.103.175.193
Model: Duplex, HP Laserjet M605 dn
Mailroom
Optra: optra.stat.ubc.ca
IP: 142.103.175.197
Model: Duplex, HP Laserjet M605 dn
ESB 3163
Mac OSX:
System Preferences -- Printers & Scanner -- + -- IP --
Address 142.103.175.193
HP JestDirect Socket
Queue Leave it empty
Name hp5
Location Mailroom
Use Select Software
Postscript
Add
NOTE: If you don't see "Postscript" software you need to follow instruction below.
Download new driver for HP Laserjet M605 and install on your computer first.
https://support.hp.com/ca-en/drivers/selfservice/hp-laserjet-enterprise-...
Install the driver and then add the printer. You will see the HP M605
After this, Configure the HP5 to add Duplex option for duplex printing.
Keep everything else as Default setting.
Windows 7: http://www.tp-link.com/lk/article/?id=240
Windows 8: http://www.tp-link.us/article/?faqid=459
In Windows 8, Swipe from the right to left, click on Search " Advance Printer Setup"
If you have a properly formatted file (i.e. it's text or a Postscript file that has been formatted for Letter (8.5"x11") size paper) but the output has been shifted right and/or down, it's likely that the printer is mistaken about the size of the paper in the print hopper.
The print hoppers has a slider that signals the printer on the type of paper loaded within (such as Letter, Legal, etc). It does this by moving fingers or knobs located on the side of the hopper that press against contacts within the printer. Sometimes either the fingers or the contacts are stuck and the printer is misinformed about the size of the paper. When a Letter size printout is being printed, the printer tries it best to print on the wrong size paper, thus the off-centered output.
The fix is two unstick the fingers or contacts so that the printer has the correct paper sizing information. If you don't know how to do this, contact the IT staff.
Two-up printing is where 2 pages are printed on one side of a paper by shrinking them, putting them side-by-side on a landscape format paper.
This is the usual default for printing text files. To disable this, you'll need to convert it to Postscript, as Postscript files are printed without reformatting:
textps file.txt | lpr -Pprintername
If you have a Postscript file, you can reformat them into a 2-up format (or even 4-up format if your eyesight can stand the strain) by filtering them through the psnup tool:
psnup -2 file.ps | lpr -Pprintername psnup -4 file.ps | lpr -Pprintername
You can combine the above two solutions to print text in a 4-up format:
textps file.txt | psnup -4 file.ps | lpr -Pprintername
For Windows users, some printer drivers will allow you to set 1-up, 2-up, 4-up and booklet format.
If a printer is out of paper (the hoppers are empty and there no packages of new paper to be found near the printer), then a fresh package or box of paper can be fetched from the mail room. Before you take some paper, please notify the Font Desk Receptionist so that the inventory can be kept up to date. If possible, please take an entire box so that this tiresome exercise need not be repeated often.
If the printer reports in the LCD window that it is low on toner, then what to do depends on how fresh this message is. The toner sensor is very conservative and will report "Low Toner" even though there is plenty of life left. To ascertain whether the toner is really running out, print a test page. If the printout is getting very light or has bald patches, then open the printer, shake the toner cartridge, reinsert the cartridge and print a few test pages again. If it comes out spotty again, then it's time to change ther printer cartridge.
Contact the IT staff to replace the cartridge.
SYNTAX
lprm -Pprinter JobID
lprm - [remove all your submitted jobs.]
EXAMPLE
lprm -Plj4 316
SYNTAX
lpr -Pprinter(s) filename
EXAMPLE
lpr -Poptra example.ps [to print double sided.]
lpr -Poptras example.ps [to print single sided.]
Just drag right-button of the mouse.
You can use command a2ps. For example, if you have a text file called input.txt and you want to print the file 4 pages per sheet, then you can use the following command to generate an output file called output.ps, then use lpr command to print the output.ps
a2ps -o output.ps -4 input.txt
lpr -Pprintername output.ps
Note that
- a2ps convert FILE(s) or standard input to PostScript. Input files can be of different type, e.g. .txt, .ps, or .html.
- you can directly print out the input file to printer by the following command:
a2ps -P -4 input.ps
However we recommend to convert the input file to output.ps first, then use ghostview to check if the format is correct or not. Finally use lpr command to print output.ps.
- For further information, please use command man a2ps to read the manual of the command a2ps.