<strong>ADVISING AND REGISTRATION INFORMATION</strong> <br /> <br />
Please read the information and FAQs below before asking for assistance. Your question may well be answered here. If your question remains unanswered, please contact the Student Services Coordinator. Registration assistance is handled centrally via email, so please do not contact course instructors or come to the Main Office for registration assistance, as you will be directed back to this webpage. <br /> <br />
Please ensure that you register in courses and labs as soon as your registration window opens. Our courses fill up fast, and we will not register you in a course that is full because you missed your registration window. <br /><br />
<strong>PREREQUISITES:</strong> <br /> <br />
Our firm policy is that students must have the required prerequisites to enroll in Statistics courses. Prerequisites for each course are as stated in the UBC Calendar. Many of our courses have a hard prerequisite check, which means that students who are lacking the exact prerequisite will be barred from registering in the course. <br /> <br />
If you believe you should be eligible to register because, for example, you have legitimate transfer credits to meet the prerequisites, please email the Student Services Coordinator. You will need to submit transcripts and/or course outlines in order to demonstrate how you meet the prerequisites for the course. This should be done well ahead of your registration time to allow time for assessment. <br /> <br />
For courses where a hard prerequisite check does not exist, please note that students are still expected to meet the prerequisites for the course. If you do not have permission to take a course for which you are lacking the official prerequisite, you may be removed from the course. <br /> <br />
Credit excluded courses: Students should keep in mind that a credit excluded course cannot be used in place of a prerequisite. Please plan your courses carefully with a view to courses you may want to take in the future. Credit excluded courses have some overlap in content, but are not direct equivalents, and thus cannot be substituted as a prerequisite. <br /> <br />
<strong>REPEATING A COURSE:</strong><br /><br />
It is a Faculty of Science regulation that students may NOT repeat a course for a higher standing. Students are only able to repeat a course if they received a failing grade. Only your Faculty Advising office has the authority to register you in a course that you previously failed. <br /> <br/>
<strong>WAIT LISTS:</strong><br /><br />
If there is a wait list for a full course that you want and have the prerequisites for, you should register on the wait list immediately. <br /> <br />
Please note the following regarding wait lists: <br />
<ol>
<li>Once we open a wait list, registration in the course is BLOCKED. This prevents anyone from registering, so no one can jump ahead of the wait list.</li>
<li>Wait lists work on a priority basis. As seats become available, students are moved manually into the course in the following order:</li>
<ul>
<li>Students in a Statistics specialization (including majors and combined majors, and all other variations), and students in certain other specializations for whom the course is <strong>required</strong>, and who register on the wait list during the <strong>first month after registration opens*</strong></li>
<li>Students in a Statistics specialization who wish to take the course to fulfill STAT elective requirements, and who register on the wait list during the <strong>first month after registration opens*</strong></li>
<li>Students registered in a minor in Statistics</li>
<li>Everyone else in order of registration on the wait list (including graduate students from other departments, non-Stat majors, visiting students, exchange and Go Global students, and Stat majors after the first month of registration)</li>
<li>In some cases, higher priority may be accorded to students in a certain year or specialization. Within a category, students are moved in order of the date they joined the wait list. *Students should register on the wait list as soon as possible. If you do not register on the wait list during the first month after registration opens, you will not be given priority, in order to be fair to other students who are on the wait list.</li>
</ul>
<li>If you are a student who is in 4th year, and need a course to graduate in May, you may be considered for forced registration or priority in the wait list. You must register on the wait list and notify the Student Services Coordinator of your situation during the first month after registration opens. Please note that only students who are within 30 credits (in September) or 15 credits (in January) of graduation will be considered for forced registration, and only when the course is <strong>required</strong>, and not an elective. We will verify this information, and notify you if you qualify. If you are able to take another course to fulfill your requirements, you will be asked to register in that course if it is not full.</li>
<li> We will be moving students from the wait list into the course in batches, and this may not occur every day. Thus, a course may seem to have seats available for several days before we will fill the seats from the wait list. Please be patient, and do not contact the Department about this issue.</li>
<li> Wait lists are managed according to the priorities described above. Please do not contact the instructor or office staff to ask about your wait list position, or to request the ability to jump the queue (except as per item 3). </li>
<li>Students who are unable to register in the wait list for reasons such as prerequisite issues should contact the Student Services Coordinator as soon as possible to be placed on the list. Please see our information on prerequisites for more information.</li>
<li>Most courses with a wait list will use these policies up to the add/drop deadline. After the add/drop deadline, no further students will be admitted to our courses, and the wait list will be purged close to the end of office hours.</li>
<li>If we attempt to move you from the wait list into the course, and you have meanwhile registered yourself in something that conflicts, we will contact you via email about the conflict. You will be given 24 hours to clear the conflict, after which time we will move on to the next student. We will only attempt to contact you once, so it is up to you to monitor your email, and clear any conflicts in a timely manner. </li>
</ol>
<br/>
<strong>REGISTRATION FREQUENTLY ASKED QUESTIONS:</strong> <br/>
Department StatNet policy for Graduate Students:
After completing your degree you will be given three (3) months to clear out your StatNet account. You will then be allowed another three (3) months 'grace' period to finally move everything from your account. After that period, your account will be terminated without notice. If you need to extend your account for any reason, you will be required to have a departmental personnel to sponsor, i.e. a faculty member.
Email forwarding will be permanent. Contact help [at] stat.ubc.ca for more detail if you have any question.
Email forwarding: messages sent to your former Email address can be forwarded to another Email address. If you've set up your own Email forwarding, it will cease to work after your account is archived; you should arrange forwarding with the IT staff before your account is deactivated to ensure continuity of service.
Department StatNet policy for staff and non-tenure faculty:
After finishing your terms with UBC, you will be given three (3) months to clear out your StatNet account. You will then be allowed another three (3) months 'grace' period to finally move everything from your account. After that period, your account will be terminated without notice. If you need to extend your account for any reason, you will be required to have a departmental personnel to sponsor, i.e. a faculty member.
Email forwarding will be permanent. Contact us for more detail if you have any question.
Microsoft's Home Use Program (HUP), is a benefit available to employees at the University of British Columbia. Employees who use the covered licenses at work are eligible to purchase Office applications for use on a personal device for the duration of the term of their employment at UBC.
Eligible employees are allowed to purchase a single license of each product available according to the terms of their organization’s Software Assurance benefit. You can learn what is covered by visiting:
https://it.ubc.ca/ubc-it-guide-working-campus
MS Office UBC license media/download available from StatNet IT are for deploying only for qualified UBC-owned computers, or purchase by faculty's grant. Your personal computer will need to purchase this, HUP, home use license.
Instructions
- Go to microsoft.com/en-us/home-use-program
- Enter your UBC email address (emails ending in @admin-at-stat.ubc.ca or @mail.ubc.ca only)
- Click Submit
- Check your inbox for an email from Microsoft, with a link to subscribe to Office 365 with 30% discount
IMAP allows you to create folders on the mail server. Spam folders are also kept on the server. If your IMAP folders are not showing up, follow these steps to subscribe to them with your Mozilla Thunderbird mail client:
- Select the mail account from the left column
- Right-click on your mail account name and select Subscribe
- You will see all the available IMAP folders on the server. Select the ones that you want to add to your mail client and click on Subscribe
- Press OK and you will notice that the new folders are now available
Edit the ~/.ssh/config file and include:
host stat.ubc.ca
KexAlgorithms +diffie-hellman-group1-sha1
HostKeyAlgorithms +ssh-rsa
1) Get the Account ID for the copier from office staff.
2) Login the Win10 computer using StatNet credential.
3) Select printer name: "Xerox WorkCentre 7855 PS". Also check the checkbox "Print in grayscale (black and white)" to save the color toner.
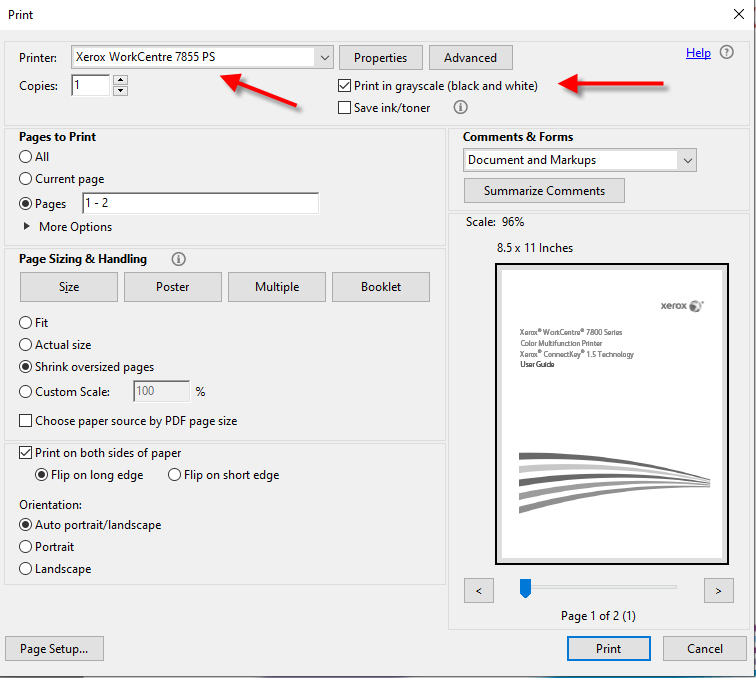
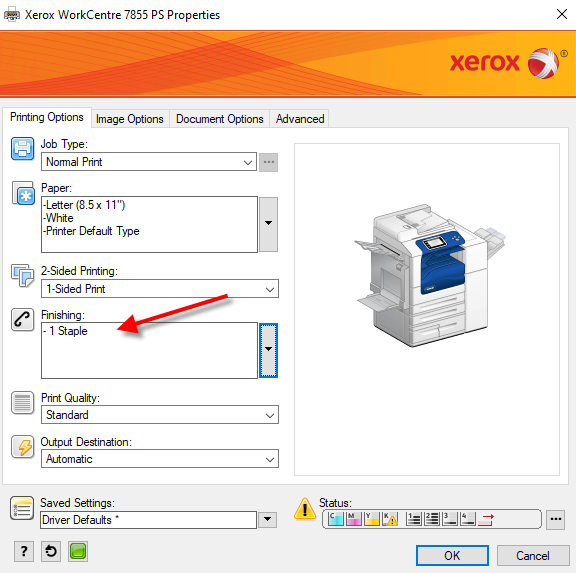
4) Click on button "Properties" you will see the form below. Select the stapling option you want, then click button "OK"
5) Enter the Account ID you get from step 1

There are 2 ways:
- Method 1:
Generate your hashed password here and send to help [at] stat.ubc.ca requesting for a password change - Method 2: from a terminal window:
$ ssh your_account [at] be.stat.ubc.ca (use your account to replace 'your_account')
$ passwd (type in your current password and then type the new password twice)
$ exit (close your terminal session)
The key is to find the accordion-### for the true URL.
https://www.stat.ubc.ca/node/accordion-###
1. Find your way to a FAQ page that includes the QA of interest.
Here is an example using Chrome:
I am interested being a Major in Statistics. How can I apply?
Navigate to
https://www.stat.ubc.ca/faqs?page=3
2. When on that page, right-clicking over the FAQ item, select "Inspect".
The tool window will highlight the accordion-### line.
(The 'x' on the top right will close this tool window.)
3. The question sits inside a div with an id of the form accordion-###.
<div id="accordion-10142"
Copy or make note of the four digit code (10142 in the example).
4. Form a URL using this code as follows:
https://www.stat.ubc.ca/node/accordion-###. For the example, it's
https://www.stat.ubc.ca/node/10142. This URL can be shared with the student.
You can setup Outlook/Apple/Thunderbird mail reader to read StatNet email. Remember to disable "Automatic manage connections" on the email client.
Here are the parameters you need to know:
Incoming mail server: imaps.stat.ubc.ca
Protocol: IMAP
Port:
If using STARTTLS: 143
If using SSL: 993
Mail Folder Prefix: (leave empty)
Outgoing mail server: mailhost.stat.ubc.ca
Protocol: SMTP
Port: one of either Ports: SMTP/STARTTLS: port 587
SMTP/SSL: port 465
If there is a choice of authentication methods, LOGIN or PLAIN will work.
UBC OneDrive info/howto:
https://it.ubc.ca/services/web-servers-storage/microsoft-onedrive
Basically OneDrive is similar to our ownCloud/Nextcloud or Dropbox services.
You will have 2 ways to access it:
a) Cloud access
Faculty and staff who meet the service requirements will be able to access the tools at https://portal.office.com by signing in with their alias.
Login: firstname.lastname [at] ubc.ca
Password: your CWL password
and going through the UBC multi-factor authentication process.
From there, they can use the web-based versions or download the OneDrive software to install it onto your desktop/laptop locally.
b) Direct access as a local drive on your desktop/laptop
You will need to install an OneDrive software, download after you login "Cloud access", onto your device so it can sync data with the OneDrive on the Cloud.
Overview
The UBC Faculty & Staff Email (FASmail) service is an enterprise email service for eligible staff, faculty and student employees of the University of British Columbia.
Documentation and References
UBC Faculty & Staff Email (FASmail)
Getting Started
*Send a request directly to UBC IT by fill in...
The "FASmail Service Request Web Form" (*Ignore "For Departmental Administrators only")
and ask for FASmail mail box with FASmail alias, "firstname.lastname(at)ubc.ca".
WebForm:
https://web.it.ubc.ca/forms/fasmail/
*Note: Make sure to supply these options...
...
[Requestor Type]
Service* [ FASmail User Mailbox ]
Request Type* (x) Add
[Technical Details]
- User's Email Alias*
(x) firstname.lastname(at)ubc.ca email alias
...
If you want to forward FASmail to your StatNet email, ask UBC IT do it for you as it's much simpler.
After you have your FASmail setup with an alias firstname.lastname@ubc.ca, notify Assistant to Head (headsec at stat.ubc.ca), so she can add your new alias to UBC Directory.
You can check it here see if it's ready entered or not.
https://directory.ubc.ca/index.cfm
Thunderbird 78 has stopped out of date use of SSLv3 and TLSv1. Here is how to fix:
- Go to Thunderbird -> Preferences -> General (for Windows users: From Home tab, click on the menu button on the top-right corner, select Options -> General)
- At the bottom of the page, click on buton Config Editor…
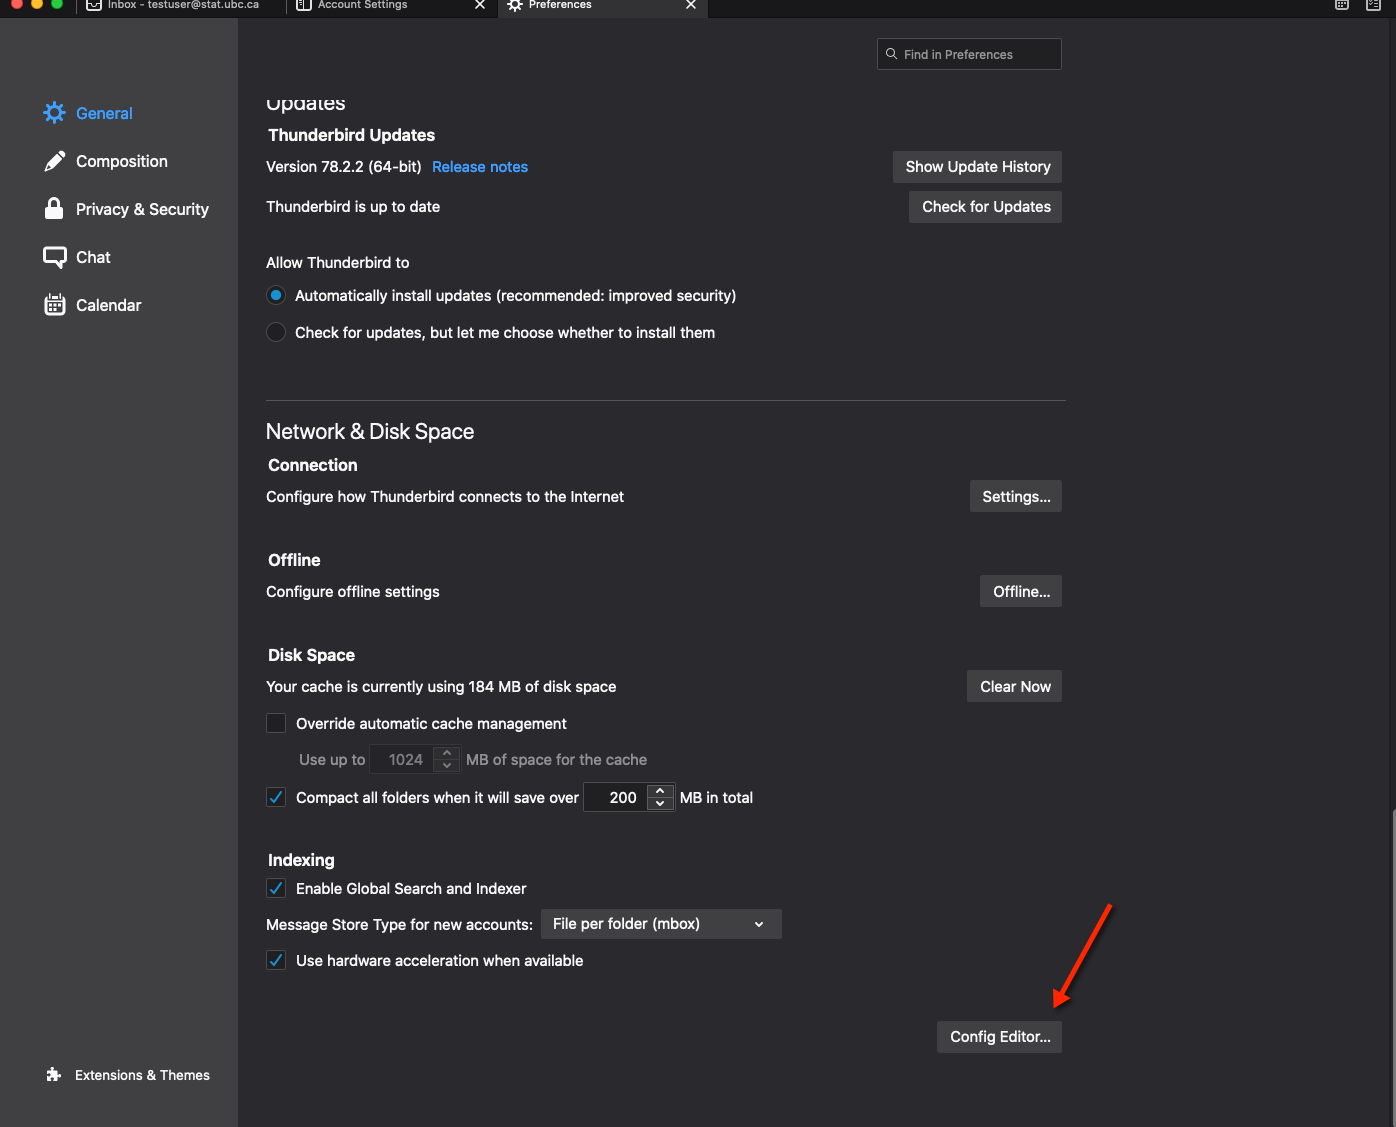
- Click to confirm "I accept the risk!"
- Scroll down to the line: security.tls.version.min and change value from 3 to 1

- Restart Thunderbird
Incoming Mail Server:
IMAP Mail Sever:
- Server Name: imap.stat.ubc.ca
- Port: 143
- Connection security: STARTTLS
- Authentication method: Normal password
- Or: Port 993 use SSL
Outgoing Mail Server:
- Server name: smtp.stat.ubc.ca
- Port: 587
- Authentication method: Normal password
- Connection Security STATTLS
1) StatNet servers:
Number crunching servers: Access via "ssh" remote login.
Linux servers : Dell R900, 16 CPUs, 16-32Gb RAM. Name after Bugs : Bee and Spider are standalone number crunching.
Virtual Linux servers: 2 CPUs, 2Gb RAM: Gosset1
Cloud Computing: contact us for more detail.
Can only access via SSH.
Software: R, C, C++, Fortran, Matlab 2009a , Java and Stata (Stata only on Gosset1 ).
MacPro servers : 8 CPUs, 8-16Gb RAM. Name after Mountain: Cypress, Grouse, Baker, Seymour: Can access via SSH and its console which located in Research lab lsk303a. You need Secure Card access to enter.
Software: OS Mac OS X Leopard, Same as Linux except R = R64 (64-bit) and Matlab 2009a
SUN Solaris 10 Unix servers: Access via "ssh" remote login.
Be.stat.ubc.ca for pine, mutt, elm and general file management only
Unixlab for IT admin only
2) Ugrad Math/Stat Computer labs
Notes: You can ONLY acess Windows server within StatNet.
Download Microsoft Remote Desktop software for your OS
Mac: Remote Desktop Connection Client 2.1
Linux: Rdesktop
Windows: Come with all OS
LSK 121: SUN Unix Solaris 10 servers
Server names: Unixlab and Statlab
Software: R, and most opensource packages
LSK 121: Windows 2003 terminal servers
Server names: windows.stat.ubc.ca
Software: Matlab, Maple, MS-Office, R, Octave, OpenBUGS/WinBUGS, TeX/LaTeX, XPP
ESB 1042 and ESB 1046: Mac OSX Lion 10.7.5 workstations
Software: Matlab, Maple, R, OpenOffice and some opensource packages
LSK 310: Windows 7 workstations
Software: Matlab, Maple, MS Office, Lindo/Lingo , R, Octave, OpenBUGS/WinBUGS, TeX/LaTeX, XPP
To borrow laptop and/or projector, you need to go to the general office to sign-in. When you return them, you need to sign-out in the general office.
The laptop OSs: Microsoft Windows 7 and Mac OS X
Both laptop and projector can be booked using MRBS booking app.
Ask the general office for help if you want to send fax. When you send fax, the document should face down.
This a rather complex question that really can't be fully addressed by a FAQ, but here are some questions that you can ask yourself that can provide a hint of what kind of PC which would be suitable for you:
- What kind of computer (i.e. desktop vs. laptop vs. other) do you want? In general, the type of PC you should get should mainly depend on the type of software you run.
- Thin clients (X terminals)
- Good for those people that want nothing to do with devices. It just work or doesn't. No configuration and the hosts that it connects to are managed by somebody else (us!).
- Not good for those that want their own PCs, run their own software or have large resource requirements.
- Laptops
- Is weight and portability the most important criteria?
- Feather Light (less than 3.2 pounds)
- advantages: lightest and most portable
- disadvantages: expensive, small screen, performance lags behind others, may not have internal CD/DVD drive.
- Medium size (4.5 to 7.0 pounds)
- compromise between Feather Light and Large.
- Large (more than 7 pounds)
- largest screen, best performance, usually has built-in CD/DVD reader, most economical with same features.
- disadvantage: bulky.
- Feather Light (less than 3.2 pounds)
- Desktops (what most people want).
- Intel based?
- AMD based: more power, cost less but needs more cooling -> more noise.
- Is weight and portability the most important criteria?
- Thin clients (X terminals)
- What kind of software do you run and what OS are you comfortable using?
- Usually breaks into 2 camps: Unix (Linux, MacOSX, etc.) vs. Windows. You should choose the OS which best represent the software you intend to use.
- Software application may determine choice of features (number crunching -> faster CPU, memory intensive software -> more CPU, etc).
- Monitors
- Size: major determinant of price (19" LCD or 21" CRT recommended).
- LCD: saves space, aesthetically pleasing, but more expensive. Graphics quality is on par with CRTs.
- CRT: bulky, heavy, more economical.
- Peripherals
- Do you need backup or portable data storage?
- The electrical system here in the Math building is somewhat flaky, so you may want to invest in an uninterruptable power supply (UPS).
- Need a printer?
- For occasional printing, use the printers provided by department.
- For special printing needs (colour) or for large amount of printing, it's better to get your own laser printer.
- Noise: do not underestimate the distraction caused by fan noise of a PC. This may be exacerbated by the varying pitch of a variable speed CPU-cooler. If you are sensitive to it, consider a thin client solution or remotely locating the PC, or ask for special consideration from the vendor.
Specific details of what (and where) we recommend changes frequently because technology and the market place change frequently. To get the most up to date recommendations on pricing and vendors, feel free to contact the IT staff.
The scanner is connect to the PC in the mail room. Both the software Photoshop and Acrobat can be used to import the scanned document. The procedures are almost the same. In the following procedures are based on Acrobat.
- Put the document face down on the panel of the scanner. Make sure that the right-upper corner of the face-downed document is aligned to the right-upper corner of the scanner panel.
- Double click the icon "Use for PDF scanning" to open Acrobat.
- Choose the submenu "Import" from the menu "File.
- Choose the subsubmenu "Scan...". A window will popup. Click the button "Scan". Wait for a few seconds to let the scanner warm up and pre-scan the document.
- The right panel of the "EPSON TWAIN 5 window is the scanned document. The left panel shows options and buttons to adjust the scanning process.
You can use the button just above the "Preview" button to adjust the scanning area. Once you click this button, an rectangle with dashed border will show up in the right panel of the EPSON TWAIN 5 window. Move the mouse over the dashed border. The shape of the mouse will change to a bar, both end of which is an arrow. Press the left-button of the mouse and drag the mouse to adjust the size of the rectangle. Make sure the size of the scanned document as small as possible. Click Preview button to update the scanning result.
Once you select the scanning area, you can press the "Scan" button to get the final version of the scanned document.
- An window will popup and ask you if you want to scan next page. If you want to scan next page, then remove the first page from the scanner panel and put the second page on the scanner panel. If you finish scanning, then you can press the "done".
- Select the submenu "Save AS ..." to save the scanned document. From the popup window, you can choose the "Save as type" (e.g. pdf, eps, jpg, etc.). The default file type is pdf (if you use Acrobat to import scanned document).
Occasionally, you need to adjust the scanning parameters (e.g. Image Type, Destination, and Resolution). You can click the "Help" button on the left-hand-side panel of the EPSON TWAIN 5 window. The following is a rough guideline.
| DOCUMENT TYPE | IMAGE TYPE | DESTINATION |
|---|---|---|
| Text only document or line-drawing (without color) | Text/Line Art | EPSON Stylus Printer (FINE) |
| Magazines or Catalogs in black & white | Black & White Document | EPSON Stylus Printer (FINE) |
| Magazines or Catalogs in color | Color Document | EPSON Stylus Printer (FINE) |
| Color Photos | Color Photo | EPSON Stylus Printer (Photo) |
Note:
- You can use the default resolution setting.
- You can use the Full Auto mode by click the "Full Auto mode..." button.
General printing command on all our Unix/Linux systems is
$ lpr -Pprintername filename
Printer Model: HP Laserjet Enterprise M605
We don't allow to print from any wireless or outside StatNet network. In order to print from our StatNet network, you must email us the MAC address from your device for you to use our "green network cable" in your office.
How to find MAC address?
How to add printer?
The following printers are available
| PRINTER | LOCATION | COMMENTS |
|---|---|---|
| hp5 | Mailroom | hp5 Duplex, hp5s1-sided |
| optra | ESB 3163 | optra Duplex, optras1-sided |
This can be made to work only for X11 applications. The following seems to work. In your .bashrc file, add
defaults write com.apple.x11 wm_ffm -bool true defaults write com.apple.Terminal FocusFollowsMouse -string YESLogout and then login again. Open two xterm's and focus should follow mouse for the xterm's.
The following is initialization.
- Double click MacIntoshHD icon on Desktop
- single click Application
- double click Utilities
- click X11 and drag to the shortcuts to the icons at the bottom of the Desktop
For future log-ins, just click on the X11 icon to open the first xterm. Other xterm's can then be opened from the Applications menu (top of Desktop).
From an xterm, use 'ssh' to get to a remote computer. X11-applications can be displayed from the remote computer to the MacIntosh display.
non-X-Terminal has proper copy and paste using Mac Command+c or v keyboard.
Click on Local Hard Drive -- Applications -- Utilities
Highlight Terminal Icon (Black) - Drag and Drop it to the Bottom Menu Bar
Click once on Terminal Icon to open new terminal.
Click on the top left menu "Terminal" - Preferences to customize your terminal session
a)Font: Text -- Change
b)VT100: Advance -- Emulation -- Declare Terminal as VT100
Close Terminal' s preferences and restart Terminal to make the changes in effect.
Method1: Hold Control button down (Ctrl) and click on a name. You will get a menu. Select " Download Linked File As".
Pick the right directory, click Save. The default folder to save is "Download" or you can change it to "Desktop"
For Mac with 3 button mouse, Right Click on the URL will get the same menu.
Method2: If you click on the file and now the plain text file is displayed in your browser.
File > Save As …. change the drop down menu from "web archive" to "page source".
You will only see the root of the filename in the Export As dialog but it's fine since OSX will add the .txt extention.
Again Save to Desktop or Download as you wish.
- lick System preference icon at bottom of Desktop
- click on mouse/keyboard
- make changes on menu so that left button is primary, right button is secondary, and dashboard is button 3.
After this, copy-paste operations are like traditional X11; (a) click with left mouse button to begin highlighting, (b) drag to end of highlighting, or use right mouse button to click end of highlighting region, (c) move mouse to location for pasting and click middle mouse button.
Resetting a user's password in Mac OS X v10.5 or later
- Log in with your default account.
- From the Apple menu choose System Preferences.
- From the View menu choose Accounts.
- Select Your username then Click "Change Password..." button (Mac OS X v10.5 or later).
- Enter your old password and your new password in both the Password and Verify fields, and add a hint if desired.
- If a dialog box appears with the message "Your Keychain password will be changed to your new account password..." click OK.
Open A Terminal (Black Icon). You don't need admin right to run the command.
Type this:
defaults write com.apple.Terminal FocusFollowsMouse -string YES
Quit and restart Terminal program.
- Select the text you want to link to the file.
- Click on the link button

- Click on 'Browse Server'
- At the top where is says 'Upload a new file in this folder' click on 'Browse'
- Choose the file you want to upload
- The file will appear in the window, click on it
- click Select.
After you save your changes by clicking on 'Update' you should be able to test that the link works to the file.
The Department's personnel web directory is located under PEOPLE here:
If you don't see your entry, you must log in to add your profile the first time using your StatNet username and password.
- Click on the link button:

- Click on Browse Server:

- Navigate to where you want the folder, and click on Create New Folder:

In this tutorial, you will learn some basics of HypterText Makeup Language (HTML). After this tutorial you will know
- What is HTML?
- How to post web pages on the Internet?
- What editor is needed to edit a web file?
- How to scan classnotes into computer as pdf files?
- How to convert file formats?
- What is HTML?
- How to post web pages on the Internet?
To post web pages, you need to put all web files into a "public_html" and set permission correctly.
First, you need to email IT help to create "data" folder for you if you don't have one yet. The new location is
/usr/local/data/your_username
ie/ /usr/local/data/john.foo
After you have your "data" folder, ssh to our Unix server and start setting it up.
ie. ssh john.foo [at] stat.ubc.ca
$ mkdir /usr/local/data/john.foo/public_html
$ ln -s /usr/local/data/john.foo/public_html ~/john.foo/public_html
Folder permission is 711 or 755 (less secure)
$ chmod 711 /usr/local/data/john.foo/public_html
$ chmod 711 ~/john.foo
Notes: To find out where your home directory is type: 'pwd'In the " public_html" folder, a file called "index.html". This file is the main web page.
Note: You can also have a webpage on unixlab,our Undergradute server. Can be useful, for keeping online material for the course you're TAing. For example, web files for user stat200 will be in /home/www/stat200/public_html
Set permission to File is 644
$ cd /usr/local/data/john.foo/public_html
$ vim index.html
$ chmod 644 index.html
Your Website is
http://www.stat.ubc.ca/~your_username/and it can be accessed from the web as http://unixlab.stat.ubc.ca/~stat200
back to top - What editor is needed to edit a web file?
On our Unix systems, Vim and Emacs. Opensource package such as Seamonkey or commercial products
such as Adobe Dreamweaver and Microsoft Expression are very good. - How to scan classnotes into computer as pdf files?
We can use Adobe Acrobat to scan classnotes. The computer we used is in the mailroom. The procedures are follows:
- Double click the use for PDF scanning icon on the desktop of Windows 2000.
- Select File from the menu bar of Adobe Acrobat
- Select submenu Import, then sub-submenu scan.
- Put the first page into the scanner. The page should face down and be put in the right-upper corner of the scanner.
- Click the Scan button on the dialog window of Adobe Acrobat.
- From the dialog window, set the value of Image type as black & white photo, the value of Destination as screen/web and the value of Resolution as 96
- Select area you want to scan into computer by pressing left-button of mouse while dragging the mouse.
- Click Scan button.
- After finishing scanning the first page, Adobe Acrobat will ask if you want to scan next page or not. If you want, just click nextbutton. Otherwise, click Done button.
- After you scan all pages of your classnotes, select menu File and submenu Save. The default file format is pdf.
Once you get the pdf file, you can upload to the course website. The procedure is
- Double click the SSH secure FTP icon on the desktop.
- Click the Quick Connect button.
- Log into the course website, stat404 say.
- Double click the public_html directory.
- From the menu bar select Operation menu and upload submenu.
- From the pop-up dialog window select the pdf file you just scan in and click Upload button.
- Select Window menu and New Terminal submenu. A terminal will pop-up.
- Go to public_html directory and change permission of all files by the command: chmod 644 *
- How to convert file formats in Unix and Linux?
To convert latex file to html files, use the command:
latex2html abc.texTo convert dvi file "abc.dvi" to ps file "abc.ps", use the command:
dvips -o abc.ps abc.dviTo convert ps file "abc.ps" to pdf file "abc.pdf", use the command:
ps2pdf13 abc.psTo directly convert latex file to pdf format, please refer to Dr. Harry Joe's tips page.
You can use the scripts makethumbs.sh and rotate.sh provided by http://www.molenda.com/makethumbs/. The basic procedure is given below.
STEP 1.
Download makethumbs.sh and rotate.sh to a directory, ~/mytools say, from http://www.molenda.com/makethumbs/.
STEP 2.
Change the modes of the files makethumbs.sh and rotate.sh by typing command:
chmod +x ~/mytools/*.shSTEP 3.
Create a directory, ~/myphoto say. And copy all your jpg files in this directory. This directory only contains the photos you want to post.
STEP 4.
Run the following command in the directory ~/myphoto:
~/mytools/makethumbs.shSTEP 5.
Make a hyperlink to ~/myphoto/index.html.
That's simple!
Notes:
- If you want to change the title of the photo webpage, captions and descriptions of the photos, you can modify the file ~/myphoto/description.txt and re-type the command ~/mytools/makethumbs.sh.
- If you want to rotate some photos, use the script rotate.sh. For example, the command cp photo1.jpg photo1.jpg.bak cp photo2.jpg photo2.jpg.bak ~/mytools/rotate.sh r photo1 photo2 ~/mytools/makethumbs.sh will rotate photo1.jpg and photo2.jpg anti-clockwise 90 degree. Since rotate.sh may modify the original file, it's better to make a backup for the file you want to rotate. You can type rotate.sh --help to obtain the usage of the script rotate.sh. The following is the copy of the usage information: bash-2.04$ ./rotate.sh --help Usage: rotate.sh [-p|-o] <-r|-l> file1.jpg file2.jpg file3.jpg ... -p | --preserve Do not touch original image, even if we can do so safely. -r | --rotate-right Rotate images to the right (90 deg clockwise) -l | --rotate-left Rotate images to the left (90 deg counter clockwise) rotate.sh tries to rotate images losslessly if possible. Lossless rotation is possible on this system, so it is the default. You can override this behavior with -o (overwrite) or with -p (preserve) Filenames can be any unique part of the filename. e.g. if DSCN0532.jpg exists, 'rotate.sh r 32' will rotate it 90 degrees clockwise. You can find the latest version of this program at http://www.molenda.com/ This is version v1.22 of rotate.sh.
- Each time you make some changes (e.g. adding new photos, modifying the descriptions, or rotating photos), you have to re-run the command ~/mytools/makethumbs.sh.
Use "be.stat.ubc.ca"
$ssh username@stat.ubc.ca
Here are the simplified instructions on how to make a password protected web folder for our site:
1) Create the private web folder in your web directory. This is the directory for which you want to curtail access to.
$mkdir -p  /nfs/fil-data/username/public_html/private
$mkdir -p  /nfs/fil-data/username/keys
2) Within this private web directory, create a file called
.htaccess
which contains the following text:
AuthType Basic
AuthName "Title of your protected folder"
AuthUserFile /nfs/fil-data/username/keys/.htpasswd
DONOT use "SSLRequireSSL" and "ErrorDocument 403 https://www.ugrad.stat.ubc.ca/~myusername/private/"
3) To create a password file with an initial user and password, use this command:
$/usr/local/bin/htpasswd -c /nfs/fil-data/username/keys/.htpasswd user1
	... enter password for users1

To add additional users, run this command:

$/usr/local/bin/htpasswd /nfs/fil-data/username/keys/.htpasswd user2
	... enter password for users2
Note: There is no "-c" for creating second users

To delete users
$/usr/local/bin/htpasswd  -D /nfs/fil-data/username/keys/.htpasswd users
4) Make sure your files and directories have the correct permissions:
$chmod 0711 /nfs/fil-data/username/public_html/private
$chmod 0644 /nfs/fil-data/username/public_html/private/.htaccess
$chmod 0711 /nfs/fil-data/username/keys
$chmod 0644 /nfs/fil-data/username/keys/.htpasswd
Test the setup by using a browser and going to your private web folder:
http://www.stat.ubc.ca/~username/private/
It is important to note that this will offer some protection of your web files against unauthorized access via a web browser, but it does not protect you from StatNet users reading your files since they can go directly to your web directory via regular filesystem commands like 'cd' and 'less' and access your files.
In this case, you ought to encrypt your files (for example, by using the zip utility to created an encrypted zip archive). This is for for highly confidential information that need to be desseminated.
Yes, if you have credit for Math 200 and Math 221 (or their equivalents), and can fit in the Science breadth requirements and the thematic concentation requirements.
For example, take STAT/MATH 302, Stat 300, Stat 344 in term 1 of year 3; STAT 305, Stat 306 in term 2 of year 3. Then you have the prerequisites for Stat 400 level courses.
Take them as soon as possible but not necessarily by the end of year 2 if there are registration issues.
Credit for CPSC 110 and one of CPSC 210 or Math 210 is required for promotion to year 4.
STAT 305 and STAT 306 (or ECON 326 for the BA Combined Major in Econ/Stat) must be completed for promotion to year 4. Please also see the Faculty of Science general requirements for promotion. For example:
http://www.calendar.ubc.ca/vancouver/index.cfm?tree=12,215,410,1467#18475
If you are in year 3, there is a deadline in early October. If you are in year 2, there is a deadline in early March.
Please see web site https://sciencecoop.ubc.ca/prospective/apply/statistics for instructions, qualifications and possible schedules for co-op terms.
You would have to apply to the CPSC Department. For the form, please see https://www.cs.ubc.ca/students/undergrad/prospective/switching/computer-.... It opens in April, and is closed for parts of the year.
Please see the Department of Economics find web link for more information. The deadline to apply is around May 20th.
https://economics.ubc.ca/undergraduate/programs/majorscombined-majors-pr...
If you have continued to take Stat / Math courses at the 300 level and above, and your grades have improved, then you can apply again at:
https://ubc.ca1.qualtrics.com/jfe/form/SV_0MQQzD5Bq1wqtyl
We assume that you are in year 2 or later. You can apply via the online form at: https://ubc.ca1.qualtrics.com/jfe/form/SV_0MQQzD5Bq1wqtyl after you have completed Stat 200 (introductory statistics), Math 200(multivariable calculus), Math 221 (linear algebra) and Math/Stat 302 (introductory probability) with decent grades.
Please read the instructions carefully before submitting your application. Applications will be considered in January and in May each year by the reviewing of overall profiles and grades in relevant Computer Science, Mathematics, and Statistics courses.
The application deadlines are mid-January and mid-May. Entry to the Statistics major is competitive. For any further inquiries such as Major in Mathematical Sciences, please contact an advisor at latemajorentrants at stat dot ubc dot ca.
If you are in year 2, follow the recommended courses listed in the academic calendar for the Statistics specialisation that you are interested in: for example, Major in Statistics, Combined Major CPSC/Statistics, Combined Major Statistics/Economics.
Take Math 200 (multivariable calculus), Math 221 (linear or matrix algebra) and Math/Stat 302 (introductory probability) as soon as possible. Then read the next item.
If you are applying at the end of year 1 and hope to be a Statistics major with year 2 standing, please follow the procedure at http://www.science.ubc.ca/students/degree/apply. You should list Statistics among your top 3 choices. If you ask for Statistics as a top choice and didn't get this choice, please go to the next item.
Yes. UBC ITServices has a software license for the Cisco Advanced Malware Protection (AMP), please refer to UBC "malware-protection" web page for more information:
https://it.ubc.ca/services/cybersecurity-services/malware-protection
The software license is applied to:
- UBC-owned devices: Supported by a Faculty, Department of Research IT Department
- Personal-owned devices: Used for University Business
We retain a copy of the latest version of UBC cybersecurity software which we can distribute locally to qualified users via our Nextcloud service, also known as owncloud.stat.ubc.ca. Please contact the department IT staff for support.
Add a guest
Guest login name should be easy to identify and no space or special characters.
ie. John Foo = john.foo
$ sudo useradd john.foo
Add guest password
$ sudo passwd john.foo
Make a strong passwd for your guest and ask your guest to call you for passwd.
Add guest to sshfs mounting group
$ sudo usermod -a -G fuse john.foo
Delete guest users account and all of their files
$ sudo userdel john.foo
Server: https://owncloud.stat.ubc.ca/
Login and password are the same as StatNet
Disk quota 20Gb
Users can add their local storage or Dropbox/Goggle Drive storage to their Owncloud account
Dropbox: You will need App key and App secret from Dropbox for Owncloud client
to use Dropbox remote storage on its server.
Login Dropbox,
Create "Dropbox API app"
--> Files and Datastores
--> No, My app needs access to files already on Dropbox
--> All file types.
http://blog.gapinthecloud.com/2012/06/13/mounting-dropbox-into-owncloud/
More info here
There are 3 ways to access your files
a) Install a Desktop sync-client How to here
Sync Client download
For Mac/Win/Linux
http://owncloud.org/sync-clients/
For Smart Mobile Devices
https://owncloud.com/blog/now-use-owncloud-on-you-ipad-iphone-or-android
b) Using a web browser
Support all major browsers. No plugin required
c) WedDav
How to here
Complete Owncloud Desktop client Document here.
On you local Mac/Linux laptop/workstation do:
$ mkdir .ssh
$ ssh-keygen -t rsa -b 4096 -f .ssh/mykeys
It will generate 2 files: mykeys and mykeys.pub inside the .ssh folder.
Use ' ssh-copy-id' command' to copy the keys to our Virtual server.
Notes: Mac OSX does not have' ssh-copy-id' command.
Download here: https://raw.githubusercontent.com/beautifulcode/ssh-copy-id-for-OSX/master/ssh-copy-id.sh
$ sudo chmod +x /usr/local/bin/ssh-copy-id
Now you can copy the newly generated key to Virtual server. (Replace 'stty2u' with your users login name)
$ /usr/local/bin/ssh-copy-id -i .ssh/mykeys stty2u [at] rcloud.stat.ubc.ca
Add your key to your laptop/workstation.
$ssh-add .ssh/mykeys
Test it
$ssh stty2u [at] rcloud.stat.ubc.ca
You should not be asked for password.
We use "sshfs" to mount your StatNet home directory securely.
For your convenient, we created a sshfs script in "/usr/local/bin/statfiles".
For usage, type 'statfiles' at the command line terminal.
Notes: If you are running batch jobs, you should mount and unmount statfiles manually.
A) To manually Mount:
$statfiles mount
$cd statfiles
B) To manually unmount
$cd
$statfiles unmount
Howto Use "sshfs" to mount your StatNet home storage automatically
1) Edit .bash_profile and remove these hashes, using vim or emacs.
$ emacs .bash_profile
...
statfiles mount
sync
cd statfiles
...
2) To unmount statfiles after logout
Edit .bash_login and remove these hashes
$ emacs .bash_logout
...
cd ~
sync
/usr/local/bin/statfiles unmount
...
3)Logout and Login your VM again.
You need to supply your StatNet passwd twice. One for your VM and one for your StatNet Home directory to mount.
4) Confirm your StatNet location
$ pwd
$ ls
5) Now you can start running your code.
$ program your_code here.
Do not save anything important on your local VM disk since it has limited snapshot and backup.
Your local VM files is saved for 7 days and every hours.
1) Using Ssh
Windows
SSHSecureShell https://owncloud.stat.ubc.ca/index.php/s/JDRoPRAeWrUHIZH
or Putty
http://www.chiark.greenend.org.uk/~sgtatham/putty/
Mac/Linux
Open a Terminal and type
ssh stat.ubc.ca -l {your login name without these parentheses}
Save your working data on
/usr/local/data/username
If you don't have the data folder ready, Email our IT help group
2) Using screen and Xpra
https://www.stat.ubc.ca/Computing/FAQ/Answer/faq.php?faq=798&category=23
I) Virtual server specs:
RHEL6 64 bit OS.
initially has min 4 CPUs, 8Gb of RAM and
40Gb NFS mount of storage with 7 days local disk snapshot only.
You should use StatNet home directory as your main storage for better backup.
At anytime your project needs to have more CPU/Ram, email help at stat with brief
a explanation of why you need more resources.
Host: v{your_login_name}.stat.ubc.ca
Login/Passwd are the same as your StatNet
After you login, your VM will NOT mount your StatNet Home directory.
This is because we want you to understand how sshfs mounting work.
We created a sshfs script in "/usr/local/bin/statfiles"
II) Software installed:
Matlab
Maple
Atlas
Sage
Octave
Blas
Lapack
Numpy
R statistics
Spicy
Xppaut
Xrpa/Screen for running app nohup remotely.
Opensource development tools
Screen
http://www.gnu.org/software/screen/
Xpra
http://xpra.org/
http://winswitch.org/
- http://www.indiana.edu/~statmath/stat/spss/win/ (getting started)
- http://www.boun.edu.tr/support/bucc/spss/spss.htm (basics)
- http://www.psych.utoronto.ca/courses/c1/spss/toc.htm (statistics analysis)
- http://www.csubak.edu/ssric/Modules/SPSS/SPSFirst.htm (statistics analysis)
- http://www.utexas.edu/cc/stat/tutorials/ (statistics analysis and more advanced help topics)
- http://scv.bu.edu/Tutorials/MATLAB/ (getting started)
- http://www.math.mtu.edu/~msgocken/intro/intro.html (basics)
- http://www.math.ufl.edu/help/matlab-tutorial/ (Summary and Tutorial)
- http://www.glue.umd.edu/~nsw/matlab.doc/techdoc/using_ml/using_ml.html (statistics analysis)
- AUCTex: Emacs package for editing LaTeX documents
- ESS: Emacs Speaks Statistics: Interactive R and S-PLUS sessions in Emacs
- UltraTex and Lightning Completion: more on LaTeX in Emacs
General Note (by Jenny Bryan): Everything like this has a learning curve, but, for all of the above, the ultimate benefits make this painful phase worth enduring.
External Resources
AUCTeX: editing LaTeX files in Emacs
AUCTeX is an Emacs package that makes editing LaTeX documents so much easier. It has been installed and configured on StatNet servers (as of November 1, 2005). However, if you want to use it on your own computer, you'll need to download the package and install it yourself (it doesn't come with Emacs by default).
When emacs opens a file with a .tex extension, the additional menus are named LaTeX and Command
- From the LaTeX menu you can select many environments without typing them (e.g. begin{enumerate} ... end{enumerate}). There are also convenient shortcuts to make typing mouse-free and even faster (e.g. C-c C-e to insernt an environment).
- From the Command menu, you can run the latex, xdvi and pdflatex programs, etc, and do a spell check that ignores latex commands. Shortcuts are also available and are, in fact, quite smart: it only takes a couple of rounds of C-c C-c to compile the file and open the result in xdvi.
This tip is provided by Harry Joe. Seconded by Mike Danilov.
ESS: Emacs Speaks Statistics
ESS a GNU Emacs and XEmacs mode for interactive statistical programming and data analysis. It is particulary good for R and S-PLUS. It has been installed and configured on StatNet servers (as of November 1, 2005) but you'll need to install it yourself if you want to use it on your own computer.
ESS can be used to save/edit interactive sessions in Splus and R (as well as SAS, stata and other statistical packages).
- To start R in emacs, type: Alt-X R (assuming Alt is your Meta key).
- Within the R command prompt, hit Alt-P to access previous R commands and Alt-N to access next R commands (which can then be edited); the list of previous commands is cyclic, so the first hit of Alt-N will lead to the first command of your present session. Note: in a properly configured environment Shift-UpArrow and Shift-DownArrow work as well.
- Requesting help on a function will bring the help documentation in a split screen, so that you can copy and paste the examples to run etc
- There is function name completion with TAB (similar to command/filename completion in the bash shell)
- more details about ESS, consult the help ess info within emacs (Crtl-h m, when in ESS)
This tip is provided by Harry Joe. Seconded by Jenny Bryan and Mike Danilov.
UltraTex and Lightning Completion
The UltraTex and Lightning Completion packages (play very nicely with AucTeX) will also really speed up writing LaTeX and will make it virtually impossible to have mismatched parentheses, opened/closed environments, references to non-existent figures/table/sections, etc. (and many other maddening mistakes).
This tip is provided by Jenny Bryan.
Most common regular expressions
| [0-9] | digit |
| [a-z] | lower case letter |
| [A-Z] | upper case letter |
| [0-9a-zA-Z] | digit or letter |
| [ ] | space |
| [ t] | space or tab |
| [^0-9a-zA-Z] | not digit or letter |
| [0-9][a-z] | digit followed by letter |
| [0-9]{3,5} | (vi, grep, emacs) 3 to 5 digits in a sequence |
| [0-9]{3,5} | (perl) 3 to 5 digits in a sequence |
| [ ]+ | (vi, grep) one of more spaces in a sequence |
| [ ]+ | (emacs/viper, perl) one of more spaces in a sequence |
| . | any symbol but n (end of line) |
| z.{2}o | (grep, vi, emacs) z followed by 2 chars followed by o |
| ^ | beginning of line |
| $ | end of line |
| ^[ ]*$ | line with zero or more spaces and nothing else (vi, perl, grep, emacs) |
| ^$ | empty line |
| ^[^0-9a-zA-Z t] | line beginning with non-digit,letter,space |
| [0-9][0-9]/[0-9][0-9]/[0-9]{4} | (vi, emacs, grep) mm/dd/yyyy date format |
| (vim) word beginning with doc | |
| bdoc | (perl, emacs/viper, grep) word beginning with doc |
| ment> | (vim) word ending with ment |
| mentb | (perl, emacs/viper, grep) word ending with ment |
Using regular expressions
GREP USAGE
put regexp in quotes, e.g. grep "^[ ]*$" files
VI USAGE
for search use / or ? followed by regexp, for replacement, use something like :10,35s/regexp1/regexp2/g where the two numbers indicate the line range; this also works in 'sed' (stream editing/batch mode of vi), and no line range for sed means all lines (i.e, :1,$ )
EMACS USAGE
ESC C-r or ESC C-s for searching for regexp M-x replace-regexp for replacement of regexp1 with regexp2
Complex regexp editing may be best done from sed or perl scripts.
Summary of perl regular expressions (from a perl book)
| /abc/ | matches 'abc' anywhere in string |
| /^abc/ | matches 'abc' at beginning of string |
| /abc$/ | matches 'abc' at end of string |
| /a|b/ | matches 'a' or 'b' |
| /ab{2,4}c/ | matches 'a' followed by 2-4 'b's followed by 'c' |
| /ab*c/ | matches 'a' followed by 0 or more 'b's followed by 'c' |
| /ab+c/ | matches 'a' followed by 1 or more 'b's followed by 'c' |
| /ab?c/ | matches 'a' followed by 0-1 'b's followed by 'c' |
| /./ | matches any character except 'n' |
| /[abc]/ | matches any of the characters within [] |
| /[^abc]/ | matches a character not within [^] |
| /(abc)/ | matches 'abc' anywhere in string, parentheses as a memory, storing 'abc' in the variables ,,, etc e.g. /name=(.*)&user=1/ |
| /abc/i | matches 'abc' ignoring case |
| /d/ or /[0-9]/ | matches a digit |
| /w/ or /[a-zA-Z0-9_]/ | matches a character classified as a word |
| /s/ or /[ rtnf]/ | matches a character classified as whitespace |
| /b/ | matches a word boundary or a backspace |
| /D/ or /[^0-9]/ | matches a character that is not a digit |
| /W/ or /[^a-zA-Z0-9_]/ | matches a character that is not a word |
| /S/ or /[^ rtnf]/ | matches a character that is not whitespace |
| /helloB/ | requires that there is not word boundary (after hello) |
| /*/ | matches * |
Submitted by Harry Joe, 2006-04-21
Note: to untar a file, type tar -xvf (filename)
UNIX Tools and VI:
![[TXT]](http://portal.stat.ubc.ca/system/files/faq_computing/text.gif) UsingVi.txt 20-Jan-2000 14:48 3k
UsingVi.txt 20-Jan-2000 14:48 3k
UsingViEnh.txt 20-Jan-2000 14:48 5k
Using_at_.txt 20-Jan-2000 14:48 2k
Using_grep_.txt 20-Jan-2000 14:48 1k
Using_tar_.txt 20-Jan-2000 14:48 1k
ViFAQ.txt 20-Jan-2000 14:48 2k
atdemo.s 20-Jan-2000 14:48 1k
atdemoscript 20-Jan-2000 14:48 1k
example.dat 20-Jan-2000 14:48 2k
![[ ]](http://portal.stat.ubc.ca/system/files/faq_computing/p.gif) format.pl 20-Jan-2000 14:48 1k
format.pl 20-Jan-2000 14:48 1k
list.tex 20-Jan-2000 14:48 2k
![[ ]](http://portal.stat.ubc.ca/system/files/faq_computing/unknown.gif) mailscript 20-Jan-2000 14:48 1k
mailscript 20-Jan-2000 14:48 1k
mailscript1 20-Jan-2000 14:48 1k
![[ ]](http://portal.stat.ubc.ca/system/files/faq_computing/tar.gif) seminar.tar 20-Jan-2000 16:54 75k
seminar.tar 20-Jan-2000 16:54 75k
students 20-Jan-2000 14:48 38k
table2html.pl 20-Jan-2000 14:48 1k
table2tex.pl 20-Jan-2000 14:48 1k

Speaker: Mark Robinson
Date: January 20, 2000
Speaker: Mark Robinson
Date: June 1, 2000
KWord is used to open, edit, and print Microsoft Word document in Linux (e.g. Pascal, Fisher and Pearson server in the department install Linux system.).
To open a Microsoft Word document, type
kword filename.doc&The interface of the KWord is quite similar to Microsoft Word.
It seems that the KWord could not save files as Microsoft Word document.
For more information, check the KWord webpage.
AbiWord is a Word processor which "will run on virtually any operating system". You can open, edit, and print Microsoft Word document by using AbiWord. It's simple and fast.
To open a Microsoft Word document by AbiWord, type
abiword filename.doc&For more information, check the AbiWord webpage.
OpenOffice.org is a multi-platform open source office productivity suite. It includes the key desktop applications, such as a word processor, spreadsheet, presentation manager, and drawing program, with a user interface and feature set similar to other office suites. It has an ability to import documents in Microsoft formats such as *.doc or *.xls.
OpenOffice exists as ooffice on pearson on StatNet and as soffice on newton on StatNet
The components of the suite are called:
WRITER
text processor which can serve as a substitute for MS Word. The command file is normally called oowriter.
CALC
spreadsheet to substitute MS Excel. Command file: oocalc.
IMPRESS
presentation suite to take place of MS PowerPoint. Command file: ooimpress.
DRAW
image and diagrams editor. Command file: oodraw.
OpenOffice.org can also export text documents (such as imported from MSWord) and presentations (e.g. converted from MS PowerPoint) into PDF documents.
OpenOffice.org is being installed by default on most modern distributions of Linux and Solaris. However, it is available for Windows as well.
In StatNet, it is available on pascal server but cannot be used due to insufficient CPU speed and other resources (as of August 2004). It can also be run on undergraduate server ugrad.
KSpread and Gnumeric can read Microsoft Excel files. The interface and the operation (e.g. short-cut key) of KSpread and Gnumeric are similar to those of Microsoft Excel. KSpread cannot save files as Microsoft Excel file format. Gnumeric can save files as Microsoft Excel (95) file format. Gnumeric can not read Microsoft Excel files which are created by higher version of Microsoft Excel than Microsoft Excel 95.
To open Microsoft Excel files, type
kspread filename.xls& or gnumeric filename.xls&For more information, check webpages of
KSpreadand
Gnumeric.
To use the following features or short-cut keys, you may need to copy files .cppvim, .cvim, .fvim, .gvimrc, .htmlvim, .texvim, .viminfo, .vimrc from Dr. Harry Joe's home directory.
- Basic operations
- Create short-cut keys
- Transform a table to LaTeX format
- Transform a table to HTML format
- Format (Splus) Output
- How to change the fontsize of the text in gVim?
- gVim file explorer
Basic Operations:
- vi is a Visual Editor. The name vi is for Visual. Visual editors are ones that let you see multiple lines of the document that you are editing as you edit it.
- vi editor has two modes (command mode and insert mode). In the command mode, you can input commands. In the insert mode, you can edit files. To enter into command mode, type ESC key. To enter into insert mode from command mode, type character i.
- u --- undo
- ctrl+r --- Redo
- :wq --- save the file and quit from vi
- :q! --- quit from vi without saving the file
- Cursor movement (all commands listed below are entered in the command mode and commands are case sensitive)
- G --- move to the end of the file
- 1G --- move to the beginning of the file
- :n --- move to the n-th row of the file (n is a non-negative integer)
- :0 --- move to the beginning of the file
- :5000 --- move to the end of the file (where 5000 can be any number which is larger than the total row number of the file)
- :-n -- move up n rows from the current row (n is a non-negative integer)
- :-6 -- move up 6 rows from the current row
- ^ --- move to the first character in the row
- 0 --- (zero) move to the beginning of the row
- $ --- move to the last character in the row
- w --- move to the beginning of the next word
- b --- move to the beginning of the previous word
- 6w --- move forward to the beginning of the 6-th word from the current position
- 8b --- move backward to the beginning of the 8-th word from the current position
- Ctrl+f --- move to the next page
- Ctrl+b --- move to the previous page
- h --- move to the previous character
- l --- move to the next character
- k --- move to the previous line
- j --- move to the next line
- use arrow keys, or ctrl+arrow keys, or pageup or pagedown keys (in either command mode or insert mode)
- ) --- forward sentence
- ( --- backward sentence
- } --- forward paragraph
- { --- backward paragraph
- ]] --- forward section
- [[ --- backward section
- select, copy, and paste
- To select text, use mouse (you can first use the mouse to hightlight part of text, then use arrow keys or pageup or pagedown key to highlight more text)
- To select text in a rectangle region
- type Ctrl+v
- hold the left-button of the mouse and drag the mouse to select the desired rectangle region
- ggvG --- to select all text in the current window
- yy --- to copy the current line to the clipborad
- 6yy --- to copy 6 lines from the current line (include the current line) to the clipboard
- p --- (small letter "p") to paste the content in the clipboard to the next line
- P --- (captial letter "P") to paste the content in the clipboard to previous line
- delete or change characters, words, or lines
- x --- to delete the current character
- ra --- to replace the current character with the character "a" (you can replace "a" with any other character)
- dw --- to delete the current word
- dj --- to delete the current line and the next line
- d} --- to delete from the current character to the end of this paragraph
- 6dw --- to delete 6 words from the current word (including the current word)
- cw --- to delete the current word and enter into insert mode (change the current word)
- 6cw --- to delete 6 words from the current word (including the current word) and enter into insert mode (change the 6 words)
- dd --- to delete the current line and copy it into the clipboard
- 6dd --- to delete 6 lines from the current line (include the current line) and copy them into the clipboard
- d^ --- to deletes from current cursor position to the first character of the line.
- d0 --- (0 is zero, not character O) to deletes from current cursor position to the beginning of the row.
- d$ --- to delete from the current current cursor position to the end of the line
- D --- same as d$
- search and replacement
- /abc --- to search the word "abc"
- /abc efg.r --- to search the phrase "abc efg.r"
- n --- to find next
- N --- to find previous
- :s/abc/ef/g --- to replace the word "abc" with the word "ef" in the range of the whole file
- :3,10s/abc/ef/g --- to replace the word "abc" with the word "ef" from the 3rd line to the 10 line.
- :1,$s/abc/ef/g --- to replace the word "abc" with the word "ef" from the first line to the last line. It is equivalent to :s/abc/ef/g.
- windows operation
- ctrl+w+s --- to split the current window horizontally (ctrl+w+s means that first hold ctrl key, then type "w" and "s" sequentially, finally release ctrl key)
- ctrl+w+v --- to split the current window vertically(ctrl+w+s means that first hold ctrl key, then type "w" and "s" sequentially, finally release ctrl key)
- ctrl+w+q --- to close the current window
- ctrl+w+w --- to jump the cursor to the next window
- ctrl+w+= --- to equalize the sizes of windows
- file operation
- :e abc.txt --- to edit (or create) the file "abc.txt" in the current window (you can use TAB to complete the command)
- :w abc.txt --- to write the content in the current window to the file "abc.txt" (you can use TAB to complete the command)
- :w --- to save the current file
- :w >> abc.txt --- to append the contents of the buffer to the file abc.txt.
- Escaping to Shell
- :!cmd --- to execute a single unix command
- :sh --- to escape to shell. By doing this, you can execute many unix command. You can return to gvim by typing Ctrl+D
- Recovering lost files
If the system crashes while you are editing with vi, you can recover the work you were doing to within a few changes.
To recover the file, abc.txt say, type command
vi -r abc.txt To get a list of the files which are saved for you, type command vi -r - Misc
- J --- join the next line with the current line
- % --- find the matched (round, squared, or curly) brackets (first put the cursor to one of the bracket, then type % to find it's counterpart bracket)
- . --- the period "." is used to repeat the previous operation
- o --- the small letter "o" is used to create a new line under the current line and enter into the insert mode
- O --- the capital letter "O" is used to create a new line above the current and enter into the insert mode
- i --- to put the cursor in the current cursor position and enter into the insert mode
- a --- to put the cursor after the current character and enter into the insert mode
- I --- to put the cursor before the first character of the current line and enter into the insert mode
- A --- to put the cursor after the last character of the current line and enter into the insert mode
- :set number --- to view the line number
- :set nonumber --- to remove the line number
- ctrl+G --- to show the state (e.g. file name, the number of lines of the file) of the file you are editing.
- `` --- (two back quotes) to get back to a previous position.
- ~ --- to switch the case of the character under the cursor.
Create short-cut keys:
You can create short-cut keys for gvim. For example, you can type ",l" to compile latex file in the current gvim window. To do that, type the following mappings in the .vimrc file in your home directory:
map ,l :!latex % map ,b :!bibtex %< map ,x :!xdvi %<.dvi & map ,p :!pdflatex % & map ,f :!xpdf %<.pdf & map ,a :!acroread %<.pdf & map ,g :!ghostview %<.ps &Transform a table to LaTeX format
(
This entry is provided by Mark Robinson in Informal Computing Seminar - January 20, 2000.
)
A really useful tool ... suppose you have a bunch of numbers which you want to put into a table in latex. This is a quick way to do it. You want to transform: 0.41 -1.00 0.27 0.01 -0.99 0.64 -2.90 0.24 -0.33 0.02 1.37 0.47 into: begin{center} begin{tabular}{|cccccc|} hline 0.41 & -1.00 & 0.27 & 0.01 & -0.99 & 0.64 -2.90 & 0.24 & -0.33 & 0.02 & 1.37 & 0.47 hline end{tabular} end{center} To do this, type (while in command mode) ":43,44!table2tex.pl" (the breakdown ... the 43,44 says it will only work on lines 45 to 46 and the !table2tex.pl will make a call a the Perl program ... note that you must have this Perl program in your current directory or some directory covered in your PATH variable)(
You can obtain the source code of the file table2tex.pl at Dr. Harry Joe's webpage http://hajek.stat.ubc.ca/~harry/local/tabl2ltx.html
)
Transform a table to HTML format
(
This entry is provided by Mark Robinson in Informal Computing Seminar - January 20, 2000.
)
Start: 0.41 -1.00 0.27 0.01 -0.99 0.64 -2.90 0.24 -0.33 0.02 1.37 0.47 Make a call to ":67,68!table2html.pl" will produce: <TABLE border=5 cellpadding=5 cellspacing=3> <TR> <TD> 0.41</TD><TD> -1.00</TD><TD> 0.27</TD><TD> 0.01</TD><TD> -0.99</TD><TD> 0.64</TD></TR> <TR> <TD> -2.90</TD><TD> 0.24</TD><TD> -0.33</TD><TD> 0.02</TD><TD> 1.37</TD><TD> 0.47</TD> </TR> </TABLE> which you can include in an HTML file.The source code of the file table2html.pl is as follows:
#! /usr/local/bin/perl #convert table to html #entries are centered justified #add parameter to <TD>to get left or right justification # for example <TD align="left"> print "<TABLE border=5 cellPadding=5 cellSpacing=3>n"; $i=0; while(<>) { chop($_); $line=$_; $line=~ s/^s+//; @fields=split(/s+/,$line); if($i==0) { $n2=0; foreach $itm (@fields) {$n2++;} } print " <TBODY> <TR>n"; for($j=0;$j<$n2;$j++) { print " <TD>", $fields[$j], "</TD>"; } print "<TR>n"; $i++; } print "</TBODY></TABLE>n";Format (Splus) Output
(
This entry is provided by Mark Robinson in Informal Computing Seminar - January 20, 2000.
)
Say you have output from S-plus which you want to format a little better ... say you want to get rid of the first and third and last column and make the rest of the columns have 1,2,3,4 decimals points respectively First, above the output, type something like "0 8.1 0 8.2 8.3 8.4 0" (the 0's signify getting rid of that column, the a.b format signifies a width of a with b decimal points) Set it up like the following: 0 8.1 0 8.2 8.3 8.4 0 [1] -1.35861443 0.30258917 -0.57190688 0.27911763 0.41829340 -0.33448098 [7] 0.14098338 0.26156014 -0.67817408 0.27750322 0.70046690 1.63321662 [13] -0.87113567 -1.09045095 1.79157953 -0.05500772 0.14935190 0.52317747 [19] 1.22088326 -0.93934903 -1.11713757 -0.59225728 -1.59756826 0.10786151 [25] 0.37489964 1.20734204 -0.25157383 -0.43282194 -0.22918384 0.29038264 [31] -0.72439167 -1.34276791 0.65337613 0.89718566 0.43414847 0.54969927 [37] 0.79278406 -1.20080351 -0.64851697 0.85754266 0.57609186 1.17390791 [43] 0.79725791 1.80341577 1.29116587 -1.90582760 -0.29568917 -1.19636474 [49] 0.02651639 -0.61876364 2.48667007 -0.36526389 0.34067777 0.94685260 [55] -0.30327891 -2.18308852 1.70048157 -0.22125863 -0.47901244 0.41492965 [61] -1.58239934 -1.70093696 1.28804581 -0.59947646 -0.57224725 0.15351164 [67] 0.58445247 0.92078516 -0.60084557 -0.48747232 -0.29188598 -0.06975106 [73] 1.26688431 -0.65137419 -0.26926444 0.92899189 0.01798242 -0.25006773 [79] 0.40696346 -1.05068278 0.78963162 0.94104497 -0.55190809 0.97130390 [85] 0.45307721 -0.47658350 0.61146376 0.14271527 -0.45779235 0.61202598 [91] -0.66847263 0.71141322 -0.55144940 -0.94407312 -0.89556232 -1.72122285 Call ":91,107!format.pl" and it should change the above to: -1.4 -0.57 0.279 0.4183 0.1 -0.68 0.278 0.7005 -0.9 1.79 -0.055 0.1494 1.2 -1.12 -0.592 -1.5976 0.4 -0.25 -0.433 -0.2292 -0.7 0.65 0.897 0.4341 0.8 -0.65 0.858 0.5761 0.8 1.29 -1.906 -0.2957 0.0 2.49 -0.365 0.3407 -0.3 1.70 -0.221 -0.4790 -1.6 1.29 -0.599 -0.5722 0.6 -0.60 -0.487 -0.2919 1.3 -0.27 0.929 0.0180 0.4 0.79 0.941 -0.5519 0.5 0.61 0.143 -0.4578 -0.7 -0.55 -0.944 -0.8956The source code of the file format.pl is as follows
:
#! /usr/local/bin/perl # formatting a data file (and also can extract subset of columns) $argc=$#ARGV+1; #print $argc,"n"; if($argc==1 && $ARGV[0]=~ /-h/) { print "usage: format.pl [-f w.d w.d ... w.d filename]n"; print "where w.d = 0 for excluding columnn"; print " otherwise w.d = width and number of decimal placesn"; print "If no '-f' flag, then first line of file has w.d ...n"; exit(0); } #for($i=0;$i<$argc;$i++) { print $ARGV[$i], " "; } #print "n"; if($ARGV[0] =~ /-f/) { $file=$ARGV[$argc-1]; $tem=shift(@ARGV); $argc-=2; print "ncol= ", $argc,"n"; open(STDIN,"<" . $file); } else { $_=<STDIN>; $_=~s/^s+//; $_=~s/s+$//; @ARGV=split(/s+/,$_); $argc=$#ARGV+1; #print @ARGV,"n"; } while(<STDIN>) { chop($_); $_=~s/^s+//; $_=~s/s+$//; @fields = split(/s+/,$_); $nfield=$#fields+1; $ncol=$argc; if($nfield<$ncol) { $ncol=$nfield+1; } for($i=0;$i<$ncol;$i++) { if($ARGV[$i]>0) { $fmt="%" . $ARGV[$i] . "f"; printf($fmt,$fields[$i]); } } print "n"; }How to change the fontsize of the text in gVim?
You can use -fn flag. For example:
gvim -fn -*-*-*-*-*-*-*-250-*-*-*-*-*-*The sequence
-*-*-*-*-*-*-*-250-*-*-*-*-*-*
is obtained by running the command
xfontsel&and select the popup menu ptSz. Click the select button to copy the sequence to the buffer. Then you can paste the sequence to the terminal after command:
For VIM 6.0, you can change the font from the Edit menu. Then select Select Font submenu.
gVim file explorer
From the Window menu of VIM 6.0, select Split File Explorer submenu. A file explorer will show on the left panel of the VIM 6.0 window. Double click a text file name in the file explorer. The text file will be shown in the right panel.
SAS usage (by Harry Joe)
SAS examples
- SAS/Insight for interactive data analysis
- Use of toolbar for fsview, fsedit, fsbrowse (with some SQL from menu), and SAS/Insight
- Notes on weights for forecasting (from FAQ at SAS web site www.sas.com)
- example of recoding missing values (missing value is internally represented by '.' in SAS. (Feb 13)
- PROC logistic, probit, genmod : logistic and probit regression in SAS; estimated covariance matrix of regression parameters can be outputted. (Feb 25)
- PROC Forecast method=stepar: an example of the stepwise autoregressive method for forecasting. (Mar 4)
- PROC Forecast method=winters and expo: an example of the Winters method and double exponential smoothing for forecasting. (Mar 8)
- merging data sets (+homework questions)
- SAS example with macro
- SAS/IML to read a data set, make modifications, convert from data set to matrix and vice versa; tree.dat referred to in the code.
- SAS/IML with a subroutine, and create a multivariate normal data set.
Note that SAS/IML can be used in "interactive mode" (but not as nice a Splus/R), with
sas -nodmsfrom the Unix command line. Then type 'proc iml' and create variables, vectors or matrices. Type 'endsas' to end your interactive SAS session. Alternatively submit IML statements from the SAS program window, and look for the output in the SAS output window (error messages in SAS LOG window).
SAS Insight for interactive data analysis
Step 1: convert an ascii/text file to SAS binary format (extension is .ssd or .ssd01 in Unix).
libname tem '/home/faculty/hjoe/s445'; data tem.iris; infile 'iris.dat' firstobs=2; /* first line consists of variable names */ /* the default field delimiter is one or more spaces */ /* there are special data formats in SAS */ input sepallen sepalwid petallen petalwid species $; run;The result in /home/faculty/hjoe/s445 is
-rw-r--r-- 1 hjoe faculty 16384 Dec 10 14:35 iris.ssd01Step 2. Starting SAS/Insight. By default, SAS/Insight will only find .ssd01 files if they are in your ~/sasuser directory. If your .ssd01 files are elsewhere, do something like below with the PROC INSIGHT.
libname s545 '/home/faculty/hjoe/s545'; proc insight data=s545.aes; run;These 4 lines can be in a SAS file, eg. startida.sas, and started with the Unix command
sas startida.sasor they can be typed in the SAS Editor Window and submitted.
SAS Toolbar
To assess your SAS data (.ssd) files interactively from menus and SAS INSIGHT, SAS FSVIEW, SAS FSEDIT, SAS FSBROWSE etc., add the path/directory names using 'libname' in your '~/autoexec.sas' file. For example, if /home/faculty/hjoe/s445 contains
iris.ssd01and /home/faculty/hjoe/sasdata contains
customer.ssd01 employee.ssd01 invoice.ssd01 product.ssd01then put the following into autoexec.sas (in your home directory)
libname s445 '/home/faculty/hjoe/s445'; libname sasdata '/home/faculty/hjoe/sasdata';By default, SAS starts with
libname sasuse '~/sasuser';A number of menus from a spreadsheet/database view can be accessed from the toolbar. For example,
- If you have a directory ~/sasuser in your home directory with a SAS file houses.ssd01, then typing fsview sasuser.houses will bring up data set with menus, from which some SQL can be done from the Search menu. Similarly, fsview sasdata.customer will open sasdata/customer.ssd01. For string variables, you can type 'Where' strings such as empname like 'S%' or empname like '___k' For SQL mistakes, note the "Undo last where" option in the Search menu.
- Typing fsedit sasdata.customer allows you to edit your SAS data set and re-save. Note that the data comes up in a form with a line for each variable.
- Typing fsbrowse sasdata.customer leads to the same format of the data set as 'fsedit' but no editing can be done.
- Typing insight will bring up a menu of your libname's from which you can choose your data set, or if you want to bring up a specific data, type something like insight data=s445.iris
- You can also bring up s445.iris by going to the Program Editor Window, choose the Globals menu, then Analyze, then Interactive Data Analysis. Then choose s445 as the library (from left panel) and the data set from the right panel, and click the Open button.
Forecast
Why do the smoothing forecasts generated by the Time Series Forecasting System differ from those generated by PROC FORECAST?
The specific methods used in the two approaches differ in two ways. First of all, the Time Series Forecasting System optimizes the smoothing weights for a particular time series while the default smoothing values of PROC FORECAST are constants that do not depend on the data series. (With PROC FORECAST, the user may specify the weights explicitly, overriding the default weights of PROC FORECAST.) Secondly, the Time Series Forecasting System uses a smoothing state initialization different than that of PROC FORECAST. For further details, see pages 225-235 of the SAS/ETS Software: Time Series Forecasting System, Version 6, First Edition and pages 443-450 of the SAS/ETS User's Guide, Version 6, Second Edition. This information is also found in the Version 7 SAS OnlineDoc.
- ntroduction
- SAS/IML Basics
- Modules
- Flow Controls
- Read, edit and create SAS data sets
- Import from and export to external files
- Graphics
- Misc. (loading and storing matrices, etc.)
- Introduction
The SAS IML language is a programming language which is used mainly to manipulate numeric and character matrices/vectors. Its grammar is quite similar to that of Splus/R.
The SAS IML language is a supplement of SAS procedures. If you can use SAS procedures to solve your problems, then you do not need to use IML.
The SAS IML language can input, create, and output SAS data sets. It also can input and output external files and can produce graphics.
The SAS IML source code (statements) should be within the procedure proc iml;. Thus the statements cannot contain other SAS procedures (e.g. proc print).
- SAS/IML software
The SAS/IML software provides a dynamic, interactive environment for programming by the SAS/IML language.
To run the SAS/IML software,
- Login to statlab
- Type command
sas&
to run SAS
- In the window "SAS: PROGRAM EDITOR", type command: proc iml;
- Press the function key F3 to submit the above sas command.
In the window "SAS: LOG", you will see "IML Ready".
Now you can program by SAS/IML. The programming process is dynamic which is similar to Splus/R.
- In Splus/R, you type your statement after the prompt ">". Once you finish typing the statement, you hit the "Enter" key to submit the statement.
- In SAS, you type your statement in the window "SAS: PROGRAM EDITOR". Once you finish typing the statement, you hit "F3" key to submit the statement.
- In the window "SAS: PROGRAM EDITOR", type quit; and press F3 key to quit the SAS/IML interactive programming process.
- If you want to print the final results of the statement you submit, you can type reset print; in the window "SAS: PROGRAM EDITOR" before your statement. If you do not want this feature later, you can type reset noprint; to turn it off. The default value is noprint.
- In the window "SAS: PROGRAM EDITOR", type quit; and press F3 key to quit the SAS/IML interactive programming process.
- If you want to print the both intermediate and final results of the statement you submit, you can type reset printall; in the window "SAS: PROGRAM EDITOR" before your statement. If you do not want this feature later, you can type reset noprintall; to turn it off. The default value is noprintall.
Like writing Splus/R programs, you also can first write SAS/IML source code in a file, then load it to the window "SAS: PROGRAM EDITOR" (Select File menu and Open submenu to load source code files). Then press F3 to submit it.
The SAS/IML source code should begin with
proc iml; and end with quit; - Some tips of using SAS
- SAS is NOT case-sensitive. So the name AB is the same as Ab, aB, or ab.
- The length of names used in SAS can not exceed 8 characters. Names should begin with a letter or underscore. The remaining parts of names can contain letter, underscores and numbers.
- A number can be expressed in scientific notation such as 1e-6.
- If the string does not contain blanks and special characters, then you don't need to use quotes.
If a character string contains blanks, special characters, the string must be enclosed by either single quote (') or double quote (").
If the string contains quotes (e.g. Can't), then you have to double them (e.g. 'Can''t').
- A missing value is denoted as a period ".".
- Any SAS statement is ended with semicolon ";".
- The comments of SAS programs are enclosed by the pair "/*" and "*/".
For example,
/* To print out final results, turn on PRINT */ reset print; - Short-cut keys
KEY DESCRIPTION F1 Invoke the online help window. F2 Invoke the window to show the short-cut keys defined in SAS. F3 Submit SAS statements edited in the "SAS: PROGRAM EDITOR". F4 Recall SAS statements from the buffer to the "SAS: PROGRAM EDITOR".
- SAS/IML Basics
The data objects of SAS/IML are matrices.
- Defining a matrix
A n by p matrix is a n by p table. That is, A n by p matrix has n rows and p columns.
- The elements of a matrix should have the same type, i.e. either numeric or character, but not mixed.
- Like Splus/R, the element (the ij-th element say) of a matrix (A say) is expressed by
A[i, j]
The i-th row is expressed by
A[i,] and the j-th column is expressed by A[,j]The expression of the submatrix consisting of the 1, 3 rows and the 2, 4 columns of the matrix A is
A[{1 3}, {2 4}] or A[{1, 3}, {2, 4}] - If A is a p by 1 column vector or a 1 by p row vector, then the i th variable is expressed as A[i]
- You can not use the statements like the followings to show the values of submatrices/subvectors of a matrix/vector:
print A[1, 2];
print A[1,];
print A[,1];
print A[{1 3}, {2 4}];
You have to first assign the submatrices/subvectors to a variable, then print the variable:
b1=A[1,2]; b2=A[1,]; b3=A[,1]; b4=A[{1 3}, {2 4}]; print b1, b2, b3, b4, A;
- Matrix Operations (creation, combining, etc.)
- To create a scalar (1 by 1 matrix), you don't need to use curly brackets "{}". For example, a=348; /* numeric value */ b="Tom"; /* character value */ c="Yes or No"; /* character value */ d=.; /* missing value */
- To create a row vector, use curly brackets to enclose its elements. Elements are separated by blanks. For example,
a={1.239 43.23 29};
b={"Tom" "Mark" "SAM"};
print a, b;
The results look like:
A 1.239 43.23 29 B Tom Mark SAM - To create a column vector, use curly brackets to enclose its elements. Elements are separated by commas. For example,
a={1.239, 43.23, 29};
b={"Tom", "Mark", "SAM"};
print a, b;
The results look like:
A 1.239 43.23 29 B Tom Mark SAM - To create a matrix, type the elements by rows and separate each row with comma. For example,
a={1 2, 3 4, 5 6};
print a;
The result looks like:
A 1 2 3 4 5 6 - To create a identity matrix, use the SAS/IML inner function I. The syntax is:
I(dimension)
For example,
I5=I(5); print I5; - To create a matrix whose elements are all equal, use the SAS/IML inner function J. The syntax is:
J(nrow<,ncol<,value>>)
where ncol and value are optional. By default, The statement J(nrow) produces a nrow by nrow matrix whose elements are all 1.
For example,
a=J(5); /* a 5x5 matrix whose elements are all 1. */ b=J(5, 3, 21); /* a 5x3 matrix whose elements are all 21. */ print a, b; - To create a block diagonal matrix, use the SAS/IML inner function BLOCK. The syntax is:
BLOCK(matrix1,<,matrix2<,...,matrix15>)
For example,
a=J(1,3); /* a 1x3 matrix whose elements are all equal to 1. */ b=J(2,1,0.5); /* a 2x1 matrix whose elements are all equal to 0.5. */ c=block(a,b); print a, b, c;The results look like:
A 1 1 1 B 0.5 0.5 C 1 1 1 0 0 0 0 0.5 0 0 0 0.5 - Like in Splus/R, we can produce index vectors in SAS/IML by using the index operator ":". For example, a=1:6; /* produce {1, 2, 3, 4, 5, 6} */ b=90:85; /* produce {90, 89, 88, 87, 86, 85} */ c='a1':'a5'; /* produce {'a1', 'a2', 'a3', 'a4', 'a5'} */
- SAS/IML have a function (DO function) like the function "seq" in Splus/R. The syntax for the function DO is
DO(from, to, by);
For example,
a=DO(2, 3, 0.5); /* produce {2, 2.5, 3} */ - The SAS/IML function "SHAPE" is similar to the Splus/R function "matrix". The syntax is
SHAPE(matrix<,nrow<,ncol<,pad-value>>>);
For example,
a=SHAPE(1:10, 5, 2); /* produce a 5x2 matrix */ print a; The result is A 5 rows 2 cols (numeric) 1 2 3 4 5 6 7 8 9 10If the argument matrix does not provide enough elements to create nrow by ncol matrix, the function SHAPE will fill in the pad-value. For example,
a=SHAPE(1:3, 5, 2, 0); /* the pad-value is 0 */ print a; The result of the above statements is A 1 2 3 0 0 0 0 0 0 0If no pad-value provides, then the function SHAPE will cycles back and repeats values to fill in. For example,
a=SHAPE(1:3, 5, 2); /* No pad-value is provided */ print a; The result of the above statements is A 1 2 3 1 2 3 1 2 3 1 - The SAS/IML operators "||" and "//" concatenates matrices horizontally and vertically respectively (They are similar to the Splus/R functions rbind and cbind respectively). For example, a=(1:3)||(4:6); print a; b=(1:3)//(4:6); print b; The results are A 1 row 6 cols (numeric) 1 2 3 4 5 6 B 2 rows 3 cols (numeric) 1 2 3 4 5 6
- To change the values of an element of a matrix, just assign new value to the element. For example, a[3,9]=0.5;
- To create a diagonal matrix, you can use the SAS/IML function DIAG. The syntax is DIAG(square matrix/vector); For example, b=diag({1 2 3}); b=diag({1 2, 3 4}); b=diag(3); /* is equivalent to b=3. */
- Matrix Algebra (+, -, *, transpose, eigenvalues, etc.)
- In SAS/IML, the basic matrix algebra such as "+, -, *" is simple. For example,
STATEMENT DESCRIPTION c=(A+B); matrix addition c=(A-B); matrix subtraction c=(A*B); matrix multiplication c=(A#B); elementwise multiplication cij=aij*bij. c=(A**2); matrix power. A**2 = A*A. Thus, A should be a square matrix. c=(A##2); elementwise power. cij=aij*aij. c=(A/B); elementwise division. cij=aij/bij. c=(A<>B); elementwise maximum. cij=max(aij, bij). c=(A><B); elementwise miminmum. cij=min(aij, bij). c=(A>=B); elementwise greater than or equal to. cij=1 if aij>= bij. cij=0 if aij<bij; c=(A<=B); elementwise less than or equal to. cij=1 if aij<= bij. cij=0 if aij>bij; c=(A>B); elementwise greater than. cij=1 if aij> bij. cij=0 if aij<=bij; c=(A<B); elementwise less than. cij=1 if aij< bij. cij=0 if aij>=bij; c=(A^=B); elementwise not equal to. cij=1 if aij is not equal to bij. cij=0 if aij = bij; c=(A=B); elementwise equal to. cij=1 if aij=bij. cij=0 if aij is not equal to bij; c=(A#(A>0)); cij=aij if aij>0. cij=0 if aij<=0. - The following table lists some commonly used matrix algebra.
STATEMENT DESCRIPTION t(A); or A`; Retrun the transpose of the matrix A. Note the quote is backquote. det(A); Return the determinant of the matrix A. Note the matrix A should be square matrix. trace(A); Return the trace of the matrix A. Note the matrix A should be square matrix. inv(A); Return the inverse of the matrix A. Note the matrix A should be square matrix. eigval(A); Return the eigen values of the symmetric matrix A. eigvec(A); Return a matrix whose columns correspond to the orthonormal eigenvectors of the symmetric matrix A. call eigen(vals, vecs, A); Calculate the eigen values and corresponding orthogonal eigen vectors of the symmetric matrix A. vals stores eigen values and the columns of the matrix vecsstore orthogonal eigen vectors. root(A); Performs the Cholesky decomposition of a symmetric and positive definite matrix A, where A=t(B)*B and B is an upper triangular matrix. The statement "root(A);" returns the matrix B. solve(A, b); Solves a system of linear equations, where A is a n by n nonsingular square matrix and b is a n by p matrix. nrow(A); Return the number of rows of the matrix A. ncol(A); Return the number of columns of the matrix A. - SAS/IML provides matrix subscript reduction operators to simplify matrix operation. The following table shows their usage:
STATEMENT DESCRIPTION A[+, ]; Get a row vector {sum(A[,1], sum(A[,2],..., sum(A[,p])} whose elements are summation of each column of the matrix A. A[ ,+]; Get a column vector {sum(A[1,], sum(A[2,],..., sum(A[p,])} whose elements are summation of each row of the matrix A. A[#, ]; Get a row vector whose elements are product of each column of the matrix A. A[ ,#]; Get a column vector whose elements are product of each row of the matrix A. A[<>, ]; Get a row vector {max(A[,1], max(A[,2],..., max(A[,p])} whose elements are maximum of each column of the matrix A. A[ ,<>]; Get a column vector {max(A[1,], max(A[2,],..., max(A[p,])} whose elements are maximum of each row of the matrix A. A[><, ]; Get a row vector {min(A[,1], min(A[,2],..., min(A[,p])} whose elements are minimum of each column of the matrix A. A[ ,><]; Get a column vector {min(A[1,], min(A[2,],..., min(A[p,])} whose elements are minimum of each row of the matrix A. A[<:>, ]; Get a row vector whose elements are indices of the maximum of each column of the matrix A. A[ ,<:>]; Get a column vector whose elements are indices of the maximum of each row of the matrix A. A[>:<, ]; Get a row vector whose elements are indices of the minimum of each column of the matrix A. A[ ,>:<]; Get a column vector whose elements are indices of the minimum of each row of the matrix A. A[:, ]; Get a row vector whose elements are the mean of each column of the matrix A. A[ ,:]; Get a column vector whose elements are the mean of each row of the matrix A. A[##, ]; Get a row vector whose elements are the sum of squares of each column of the matrix A. A[ ,##]; Get a column vector whose elements are the sum of squares of each row of the matrix A. You can use these operators in both row and column. Row reduction is done first. You also can repeat reduction operators. The following table gives some examples.
STATEMENT DESCRIPTION A[+,<>] Get the maximum of the sums of columns of the matrix A. A[{2 6},<>] Get the maximum of the rows of the submatrix A[{2 6},]. A[ ,<>][+, ] Get the sum of the maximum of the rows of the matrix A. For vectors, we also can use these reduction operators. For example,
A[+]; /* A[+] is equivalent to "A[+,];" if A is a column vector and is equivalent to "A;" if A is row vector. */
- In SAS/IML, the basic matrix algebra such as "+, -, *" is simple. For example,
- Defining a matrix
- Modules
SAS/IML is a programing language. You can define your own modules. There are two kinds of modules. One is function and the other is subroutine.
- Functions
The basic structure of a function in SAS/IML is:
start function name (arguments); function body return(values of the the function); finish function name;For example,
/* define a function */ start test (x,y); z=3; x=4; y=5; p=6; return(x+y-z-p); finish test; a=1; b=2; p = -0.2143; c=test(a, b); print a, b, p, c;The results are:
A 4 B 5 p -0.2143 C 0- The variables (e.g. p and z in the above example) created within a function are local variables. They will not be available outside the function.
Note that although a variable p is defined before calling the function test, the variable inside test is different from that defined outside test. SAS/IML allocate memories for them separately. For the variable inside test, its memory is temporary. This memory will be recycled after calling the function test.
- The arguments (e.g. a and b in the above example) of a function are similar to the pointers in C language. If you change their values inside the function, the values remain changed outside the function. In the above example, the values of variables a and b are changed inside the function test. After calling the function test, the values of variables a and bremain changed.
- A function can return only one data object. Although you can ``return'' more than one data object by defining output as arguments of the function, it's better to use subroutine instead of function in this case.
- The variables (e.g. p and z in the above example) created within a function are local variables. They will not be available outside the function.
- Subroutines
Subroutines are similar to functions. The main differences are:
- subroutines do not contain return statement.
- To call subroutines, you have to use one of the following syntax: call subroutine name (arguments); or run subroutine name (arguments);
The basic structure of a subroutine in SAS/IML is:
start subroutine name (arguments); function body finish subroutine name;For example,
/* define a subroutine */ start test2 (c, x,y); z=3; x=4; y=5; p=6; c=x+y-z-p; finish test2; a=1; b=2; p = -0.2143; call test2(c, a, b); print a, b, p, c;The results are:
A 4 B 5 p -0.2143 C 0
Note that
- If the function name you defined is the same as the name of an inner function of SAS/IML, then SAS/IML will use the inner function instead of the function you defined.
- The difference between run and call is how to deal with the case where the subroutine you defined has the same name as an inner subroutines. If you use run to call the subroutine you defined, SAS/IML will call the subroutine you defined. If you use call, SAS/IML will call the inner subroutine.
- Functions and/or subroutines can be nested into other functions and/or subroutines.
- If the arguments are used as output, then it's better to put them before those arguments which are used as input.
- Functions
- Flow Controls
Like any other programming language, SAS/IML allows the user to control the path of the execution.
- Go to top
- IF-THEN/ELSE
The syntax is
IF expression THEN statement1; ELSE statement2;For example,
if a[k] < mymax then ; /* null statement */ else mymax=a[k];Note that IF statements can be nested into other IF statements.
- Do groups
- Iterative Do statement.
The syntax is
DO variable=start TO stop BY increment; statements; END;For example,
DO i=1 to n by 1; a[i]=i; END;By default the increment is 1.
- DO WHILE statement.
The syntax is
DO WHILE(expression); statements; END;The statements will be executed if the expression is true. For example,
loop=2; a=1; do while(loop < 100); a=a//loop; /* concatenate vertically */ loop=loop+1; end;The above statements produce the column vector {1, 2, ..., 99}.
Note that the "do while" statement evaluates the expression at the beginning of the loop.
- DO UNTIL statement.
The syntax is
DO UNTIL(expression); statements; END;The statements will be executed if the expression is false. For example,
loop=2; a=1; do until(loop < 100); a=a//loop; /* concatenate vertically */ loop=loop+1; end;The above statements produce the column vector {1, 2}.
Note that "do until" statement evaluates the expression at the bottom of the loop so that the loop always execute at least once.
- DO DATA statement.
The "DO DATA" statement is used to read data from external files. It can also be used to process SAS data sets. The syntax is
DO DATA; statements; END;For example,
infile 'abc.txt'; /* open abc.txt */ do data; input x; /* read a data value */ y = y//x; end; print y;
- Iterative Do statement.
- Pause, Resume, Stop and Abort
- PAUSE statement.
The syntax is:
PAUSE <message><*>;The "PAUSE" pause the execution of the program. You can enter more statements. Type "RESUME;" to continue execution at the place where the most recent PAUSE statement was executed.
PAUSE must be used within a module.
Examples:
pause "variable x should be numeric! Assign correct value to x, then type RESUME;"; pause *; /* suppress printing any message. */ - STOP statement.
The syntax is
STOP;The "STOP" statement is similar to PAUSE.
- ABORT statement.
The syntax is
ABORT;The "ABORT" statement stops execution and exits from IML.
- PAUSE statement.
- Read, edit and create SAS data sets
SAS/IML can create matrices/vectors by reading data from SAS datasets. SAS/IML also can edit and create SAS data sets.
- Go to top
- Read SAS data sets
To read a SAS data set, abc say, you need to
- open the data set by the "use" statement. For example,
use abc;
The syntax of the USE statement is
USE SAS data set name <VAR variables> <WHERE(expression)>; - read data into a matrix by using the "read" statement. The syntax of the read statement is
READ <range> <VAR variables> <WHERE (expression)> <INTO name>;
where range specifies which observations (rows) in the SAS data set you want to use. variables specifies which variables (columns) in the SAS data set you want to use
For example,
/* "point {1 3}" specifies that the 1st and 3rd observations (rows) of the data set will be read. x, y and sex are variables in the data set. */ read point {1 3} var {x y} where(sex="F") into a; /* "all" specifies that all observations (rows) of the data set will be read. */ read all var {x y} into a; - To close a SAS data set in IML, type close test;
To show the information of the data set, you can use "SHOW" and "LIST" statements. For example,
show datasets; /* shows how many data sets are used in IML and which one is currently used */ show contents; /* shows the contents (e.g. type of variables) of the current used data set. */ list all; /* list all observations and all variables of the current used data set. */ list point {3 6} var {x} where(sex="F"); - open the data set by the "use" statement. For example,
use abc;
- Edit SAS data sets
To edit SAS data sets, you need to
- use the "EDIT" statement to set the current used SAS data set for both input and output. The syntax of the EDITstatement is
EDIT SAS data set name <VAR variables> <WHERE(expression)>;
For example,
edit test; - find the observations you want to update by using the "FIND" statement. For example, /* find the row numbers of all observations for Tom and stores the row number into matrix pos. */ find all where(name="Tom") into pos; /* list the value of pos */ print pos; /* list the observation */ list point pos;
- update the values. For example, age=20; /* replace Tom's age with 20 */ score=90; /* replace Tom's score with 90 */ replace; /* update the values in the SAS data set */ list point pos; /* list the observation again to check if it is updated */
You can delete the observations in the SAS data set by using the "DELETE" statement. For example,
delete; /* delete the current observation */ delete point {1 3}; /* delete the 1st and 3rd observations */ delete all where (name="Tom"); /* delete all observations of Tom */ - use the "EDIT" statement to set the current used SAS data set for both input and output. The syntax of the EDITstatement is
EDIT SAS data set name <VAR variables> <WHERE(expression)>;
- Create SAS data sets
You can create SAS data sets from matrices. The syntax is as follows:
CREATE SAS data set name FROM matrix name <[COLNAME=column-name ROWNAME=row-name]>;For example,
a=1:100; create test2 from a [colname="id"]; append;
- Import from and export to external files
- Go to top
- Import from external files
The followings show steps to import an external file into SAS/IML:
- Assign an alias to the external file by using a FILENAME statement. For example, /* refer "testfile" to the external file "abc.txt". */ /* "testfile" is an alias of "abc.txt". */ filename testfile 'abc.txt';
- Open the external file for input by using an INFILE statement. For example, infile testfile;
- Set the length of any character variables. For example, name='1':'8'; /* name="12345678"; */ sex='1';
- Create a new SAS data set. For example, /* the name of the new SAS data set is "test". */ create test var {name sex score};
- Read data by using the "DO DATA" statement and the "INPUT" statement. For example, do data; input name $ sex $ score; append; end;
- Close the external file by using the "CLOSEFILE" statement. For example, closefile testfile;
- Export to external files
To write a matrix to an external file, you can follow the steps below:
- Assign an alias to the external file by using a FILENAME statement. For example, /* refer "testfile" to the external file "abc.txt". */ /* "testfile" is an alias of "abc.txt". */ filename testfile 'abc.txt';
- Open the external file for output by using an FILE statement. For example, file testfile;
- Output the matrix to the external file by using DO loop and the "PUT" statement. For example, n=nrow(A); p=ncol(A); do i=1 to n; do j=1 to p; /* Output A[i,j] using SAS format 6.4. There are 2 space between A[i,j] and A[i,j+1]. @ instruct IML to put a hold on the current record (row) so that IML can write more to the same record (row). */ put (A[i,j]) 6.4 +2 @; end; /* the symbol "/" instruct IML to start a new record (row) */ put /; end;
- Close the external file by using the "CLOSEFILE" statement. For example, closefile testfile;
- Graphics
You can draw plots in SAS/IML. To draw a plot in SAS/IML, you can follow the steps below.
- Start graphics. /* This is similar to Splus/R function x11() or motif(). But after call gstart, no window will popup. */ call gstart;
- Start a new graph. /* instruct IML to erase old graph instead of plotting new graphs on the old graph. */ call gopen;
- Define display window. /* define the coordinates of the lower-left and upper-right corners. The range of the data should within this area. Otherwise, IML will not draw data points outside this area. */ x1=0; y1=0; x2=200; y2=200; call gwindow({x1 y1 x2 y2});
- Draw points. /* Draw scatter plot of y versus x. Points have diamond shape and green color. */ call gpoint(x, y, "diamond", "green"); /* Connect points by solid green line. */ call gdraw(x, y, 1, "green");
- Display the graph. /* A graph window will popup and shows the graph you specified above. */ call gshow;
- By default, the graph does not show border and axes. You have to specify them by the "GPOLY", "GXAXIS" and "GYAXIS" statements.
- You can add labels in the graph by using the "GSET", "GTEXT" and "GVTEXT" statements.
- To add title, you can use the "GSCENTER" statement.
- Misc. (loading and storing matrices, etc.)
To save memory, you can first store matrices into library storage, then release these matrices. If you want to use these matrices again, you can load them from library storage.
To store matrices, use the "STORE" statement. For example,
store a b; /* store matrices a and b */To release the memory of matrices, use the "FREE" statement. For example,
free a b;To show which matrices in the library storage, use the "SHOW" statement. For example,
show storage;To load matrices from the library storage, use the "LOAD" statement. For example,
load a b;
SAS IML Software: Usage and Reference, Version 6, First Edition. SAS Institute Inc., Cary, NC, USA, 1990.
You can use SAS software online for teaching, provided by SAS.
Detail how to setup and running provided by Dr. Harry Joe: http://www.ugrad.stat.ubc.ca/~hjoe/sas
Method 1.
If you are using SAS version 6.12 in Unix...
Step 1
Output SAS data to the desired directory as usual. The file extension using SAS version 6.12 should be .ssd01. Suppose a SAS data file named myfile.ssd01 is located under /home/user/data/.
Step 2
In Splus 3.4 or above, use the function sas.get(). For example, if you want to name the data set as "mydata" in Splus, type the following at the Splus prompt:
mylibrary <- "/home/user/data/"
mydata <- sas.get(mylibrary,"myfile")
For more detail, do help(sas.get).
OR
In Splus 5 or above, use the function importData(). For example, if you want to name the data set as "mydata" in Splus, type the following at the Splus prompt:
mydata <- importData("/home/user/data/myfile.ssd01",type="SAS1")
For more detail, do help(importData).
If you are using SAS version 7 in Unix...
Step 1
Output SAS data to the desired directory as usual. The file extension using SAS version 7 should be .sas7bdat. Suppose a SAS data file named myfile.sas7bdat is located under /home/user/data/.
Step 2
In Splus 5 or above, use the function importData(). For example, if you want to name the data set as "mydata" in Splus, type the following at the Splus prompt:
mydata <- importData("/home/user/data/myfile.sas7bdat",type="SAS7")
For more detail, do help(importData).
If you are using SAS version 8 in Unix... see Method 2.
Method 2 (recommended). Create a transport file from SAS (this works for SAS version 6.12 or above)
Step 1
In the SAS code, include the following line when defining SAS libraries:
libname sasdata xport "/home/user/data/file.tpt";
- "libname" and "xport" are required in the syntax
- "sasdata" is the user-defined library name
- "/home/user/data/file.tpt" is the full path name of the transport file (Note the .tpt extension!). "file.tpt" is the file you want to output from SAS and later to be read into Splus
Don't forget to name the file to be outputted in a SAS procedure as "sasdata.file.tpt" in the SAS code!
Step 2
In Splus 5 or above, use the function importData(). For example, if you want to name the data set as "mydata" in Splus, type the following at the Splus prompt:
mydata <- importData("/home/user/data/file.tpt",type="SAS_TPT")
For more detail, do help(importData).
Note:
1. Splus 3.4 does not have the importData() function.
2. The sas.get() function may not read data files created by SAS of version 7 or above.
3. The importData() function may not read data files from SAS of version 8 even though the file suffix can be the same as version 7 files (.sas7bdat).
4. For Splus 4+ in Windows, use the import.data() function instead.
SAS Macro Language
- Introduction
- Macro Definition
- Defining Macro Variables
- Commenting in Macros
- Invoking a Macro
- Passing Information into a Macro Using Parameters
- Generating Repetitive Pieces of Text Using %DO Loops
- Combining Macro Variable Reference with Text
- Referencing Macro Variables Indirectly
- Scope of Macro Variables
- Forcing a Macro Variable to be Local
- Creating Global Macro Variables
- Introduction
The macro facility is a powerful tool for extending and customizing the SAS System. It is particularly useful if you are to repeat some common tasks in the input data step, etc. Writing a macro in SAS is like writing a function in Splus. With the macro facility, you can assign a name to a character strings or groups of SAS programming statements. When you want to run those programming statements, you can just refer to the name assigned.
When you use a macro facility name in a SAS program, the macro facility generates SAS statements and commands as needed. The rest of the SAS System receives those statements and uses them in the same way it uses the ones you enter in the standard manner.
The macro facility has two components:
1. The macro processor - the portion of the SAS System that does the work.
2. The macro language - the syntax that you use to communicate with the macro processor.When the SAS System compiles program text, two delimiters trigger macro processor activity:
&name refers to a macro variable. The form &name is called a macro variable reference.
%name refers to a macro.
- Macro Definition
The syntax for defining a macro is as follows:
%macro macro-name;
macro-definition
%mend macro-name;
Note that in defining a macro, you need to give it a distinct name. You will also need to begin and end the macro with the %macro and %mend statements, respectively. The macro-name specified in the %mend statment must match the macro-name in the %macrostatement. Examples of macros will follow in the later sections.
- Defining Macro Variables
Macro variables are an efficient way of substituting text strings in SAS code. One way of defining a macro variable is by using the %letstatement to assign the macro variable to a name, and a value.
For example,
%let subject=Statistics;
subject is the macro variable name and Statistics is its value. Assigning a text string to a macro variable does not require quotation marks to embrace the string, as opposed to the standard way of text string assignment to non-macro variables in SAS.Later, when you want to create a title for the data set you use for the Statistics 200 course, you would like the text Statistics to appear. To refer to the variable subject, precede the variable name with an ampersand (&) (for macro variable reference):
title "Data for Statistics 200 class;
title "Data for &subject 200 class";
The macro processor resolves the reference to the macro variable subject, and the statement becomes
-
An important note: the macro processor resolves macro variables references within DOUBLE quotation marks but NOT within single quotation marks.
- Commenting in Macros
There are two ways of inserting comments in Macros:
1. begin with /* and end with */
2. begin with a %* and end with a ;An example:
%macro comment;
/* the first type of commenting */
%let myvar=abc;
%* the second type of commenting;
%let myvar2=xyz;
%mend comment; - Invoking a Macro
The general rule for invoking a macro is to precede the name of the macro with a percent sign (%). Unlike typing a SAS statement, the statement for macro invocation does NOT end in a semicolon.
In the previous section, we have defined a macro named comment. To invoke the macro, simply do
%comment
- Passing Information into a Macro Using Parameters
Here we will see the similarity between a macro and a user-defined function in other programming language such as Splus.
Suppose we are interested in defining a macro which takes in the x and y variables and plot a graph of y versus x. The following macro myplot will do the job:
%macro myplot(x=,y=);
proc plot;
plot &y * &x;
title "plot of &y versus &x";
run;
%mend myplot;
A macro variable defined in parentheses in a %macro statement is a macro parameter. Macro parameters allow you to pass information into a macro. They are like input arguments in routines in Splus, C/C++, etc.
To invoke the macro myplot in the above example, you must provide values for the two parameters x and y. Say, you want a graph of income versus age, then do:
%myplot(x=age,y=income)
where the variables age and income already exist in a SAS data set. The macro processor matches the values specified in the macro call to the parameters in the macro definition. Macro execution produces the following code:
proc plot;
plot income * age;
title "plot of income versus age";
run;
- Generating Repetitive Pieces of Text Using %DO Loops
To generate repetitive pieces of text, one can make use of an iterative %DO loop. Suppose you want to list of a series of data sets or variables whose names share a certain pattern. The following macro can reduce the amount of typing in listing the data sets or variables:
%macro names(name=,count=);
%do n=1 %to &count;
&name&n
%end;
%mend names;
Say, you are to list 5 data sets named data1, data2, data3, data4 and data5 in your data step, you can do:
data %names(name=data,count=5);
Macro execution produces the following code:
data data1 data2 data3 data4 data5;
Note that to concatenate the text string passed to the macro parameter name and the number passed to the macro parameter count, we only need to juxtapose the macro variable references &name and &count.
However, to concatenate a text string passed to a macro parameter and another text string (the second is not through a macro parameter), we may need the period character (.). See the section of Combining Macro Variable Reference with Text for more detail.
- Combining Macro Variable Reference with Text
Let us first look at the following piece of SAS code with the use of macros:
%let name=sales;
data AB&name.dat;
set save.&name;
if units>100;
run;
Macro execution produces the following code:
data ABsalesdat;
set save.sales;
if units>100;
run;
The student who wrote the above code was planning to create a data set named ABsalesdat which was a subset of the data saved in savesales where the units variable in savesales was larger than 100. But the macro execution of his code did not produce his desired output. In particular, save.sales was shown instead of the desired savesales.
Here is the trick for concatenating text and macro variables:
1. To precede a text string "string1" with another string assigned to a macro variable mystring, simply juxtapose the first text string (without quotation) with the macro variable reference &mystring, i.e., do
string1&mystring
2. To add a suffix "sufstring" to a text string assigned to a macro variable mystring, you will need the period character (.), i.e., do
&mystring.sufstring
You can combine the two rules to concatenate more than 2 text strings involving a macro variable. In the above example, execution of AB&name.dat produces a string that precedes the text string "AB" with the macro variable reference &name, which is followed by the suffix "dat". However, the execution of save.&name interprets "." as part of the string "save." and thus concatenates it to the string "sales" from resolving the macro variable reference &name.
- Referencing Macro Variables Indirectly
Let us consider the following macro:
%let city1=New York;
%let city2=Boston;
%let city3=Seattle;
%let city4=Las Vegas;
%macro listcity(count=);
%do n=1 %to &count;
&city&n
%end;
%mend listcity;
The above macro listcity was written by a student who wanted to save some typing when listing names of US cities. Unfortunately, when he calls the macro to list the first three cities using
%listcity(count=3)
SAS macro processor gives an error message saying "macro variable city is not resolved." To understand what has gone wrong, we need to know how the SAS macro processor interprets
&city&n.
The macro execution will try to concatenate the two macro variable references &city and &n, while the student wants the concatenation of the text string "city" and the macro variable reference &n completed before the processor references the resulting variables city1, city2 and city3.
To solve the problem, precede &city&n by another ampersand sign (&), i.e.
&&city&n
The double ampersands && will be first interpreted as a single & (this & will be kept aside and wait for referencing at a later time), and the concatenation of the text string "city" and the macro variable reference &n will be done prior to referencing the variables city1, city2and city3.
- Scope of Macro Variables
Let us consider the following macro:
%let datanew=inventory;
%macro conditn;
%let dataold=sales;
%let cond=cases > 0;
%mend conditn;
%macro name;
%let datanew=report;
%let dataold= warehse;
%conditn
data &datanew;
set &dataold;
if &cond;
run;
%mend name;
The very first %let statement defines the datanew variable globally. In contrast, all %let statements within macros will define variables locally unless a variable has already been defined in an open code (i.e., not within other macros) prior to its definition within a macro. In the above, the variable datanew reappears in the macro named name. Since this variable is defined earlier in an open code, it remains global throughout the code. The variables dataold and cond are local.
When we invoke the macro name using
%namethe SAS macro processor will give an error message saying "The macro variable cond is not resolved." The problem behind is related to the scope of the macro variables. When the macro name is invoked, the first %let statement assigns the text string "report" to the global datanew variable (it replaces the original assigned string "inventory" by "report"). The second %let statement defines a local variable named dataold and assigns it a value of the text string "warehse". Next, the macro conditn is invoked. Within this macro, the variable cond is defined locally, and the value of the variable dataold is reassigned to the text string "sales". However, after the execution of the statement %conditn, the variable cond no longer exists (because it is local within the macro conditn only!!), so in the if statement in the later data step, the macro variable cond cannot be resolved. The other two variables datanew and dataold in the data step can be resolved because they still exist within the scope of the macro name.
Indeed, the SAS macro processor interprets the above code upon the invocation of the macro name as follows:
data report;
set sales;
if &cond; <-- this gives an error!
run; - Forcing a Macro Variable to be Local
Sometimes it might be useful to force a variable local within a macro if a (global) variable of the same name has been defined earlier in an open code, e.g. you might not want to alter the value of a global variable throughout the code. Of course, by avoiding the use of a variable name same as that of some global variable, we will not have problems of accidental alteration of the values of global variables.
The following shows an example when a local definition is necessary:
%let n=North State Industries;
%macro namelst(name,number);
%do n=1 %to &number;
&name&n
%end;
%mend namelst;proc print;
var %namelst(dept,5);
title "Quarterly Report for &n";
run;The macro namelst makes use of a %DO loop (as discussed earlier) for generating repetitive pieces of text (in here, the repetitive pieces are name1, name2 and so on). The variable n is global, as defined in the first %let statement. Within the macro namelst, the variable nserves as a counter. However, when the macro namelst is invoked later in the proc print step, the value of n changes during the execution of the %DO loop. In particular, it is the value of the global variable n that is changed. So in the title statement where referencing the variable n is required, the SAS macro processor will print a title
"Quarterly Report for 6".
The macro variable reference 6 is the result of running the %DO loop five times after the invocation of the macro namelst.
One can imagine the desired title should be "Quarterly Report for North State Industries", which can be obtained by forcing the variable n local within the macro namelst. The %local statement is used to keep a variable local; just add the line%local n;
before the %DO loop in the macro namelst. The value of the global variable n (the text string "North State Industries") will not be affected by the change of values of the locally defined variable n within the macro.
- Creating Global Macro Variables
The %local statement allows one to create local macro variables. Similarly, the %global statement creates a global macro variable if a variable with the same name does not already exist.
Referring to the example we gave earlier when we discussed the scope of macro variables, the macro variable cond is not resolved during the execution of the data step within the macro name. This is because the variable cond is defined locally within the macroconditn and it does not exist after the execution of this macro. To avoid problems in referencing the macro variable cond in the data step, we can use the %global statement in defining the macro conditn, as follows:
%macro conditn;
%global cond;
%let dataold=sales;
%let cond=cases > 0;
%mend conditn;
Invoking the macro name generates the below statements:
data report;
set sales;
if cases>0;
run;
Note: You CANNOT use the %global statement to make an existing local variable global!
If you want to put the data step outside the macro name, then all the macro variables have to be global for the macro processor to resolve the references. You cannot add the macro variable dataold to the %global statement within the macro conditn since the %letstatement in the macro name has already created dataold as a local variable to name by the time conditn begins to execute.
Reference:
SAS Macro Language: Reference, First Edition. SAS Institute Inc., Cary, NC, USA, 1997.
Server host SAS: unixlab.stat.ubc.ca
OS: Unix Solaris
Hardwares: SUN 280R, 2x 1.4Mhz CPUs, 4Gb of Memory
Location: Undergraduate Network, Room LSK 121
Access mode: Via LSK 121 lab or SSH for remote login.
- SAS basics collected and maintained by Harry Joe
- SAS Tutorial for Unix
- Introduction to SAS Programming
SAS/STAT
http://www.id.unizh.ch/software/unix/statmath/sas/sasdoc/stat/
SAS/MACRO
http://www.id.unizh.ch/software/unix/statmath/sas/sasdoc/macro/
SAS/IML
http://www.id.unizh.ch/software/unix/statmath/sas/sasdoc/iml/
SAS AND EVERYTHING
http://www.math.wpi.edu/saspdf/common/mainpdf.htm
MASTER INDEX FOR SAS ONLINEDOC
http://www.id.unizh.ch/software/unix/statmath/sas/sasdoc/mindex/a-index.htm
There seem direct way to read .xls format file (see http://maths.newcastle.edu.au/~rking/R/help/00b/2519.html).
However, there some ways to indirectly read .xls file. For example, you can save the .xls file into .csv (comma separated value) format. Then use R's function read.csv to read it.
The reason to save .xls file to .csv file is that usually there are some columns in .xls file which are strings containing white spaces. So if to save .xls file to white space delimited or TAB delimited, then it is still difficult to read the file into R.
In R, we can call Fortran subroutines. For example, we have the following toy Fortran subroutine in the file test.f.
CCCCCCCCCCCCCCCCC C The subroutine is to calculate Hadama product of two matrices. C out[i][j]=x[i][j]*y[i][j]. C Both R and Fortran store matrix by column. CCCCCCCCCCCCCCCCC CCCCCCCCC Fortran program (f77) has to be between 7-th and 72-th column. CCCCCCCCC The 6-th column is for continuation marker. subroutine myHadamaProduct(x, y, nrow, ncol, mo) integer i, j, nrow, ncol CCCCCCC In Fortran, you don't need to specify the second dimension for matrix double precision x(nrow, *), y(nrow, *), mo(nrow, *) do i = 1, nrow do j = 1, ncol mo(i,j)=x(i,j)*y(i,j) enddo enddo return end- First, we need to compile the file test.f to create a shared library, test.so say, by using the GNU Fortran compiler: g77 -fpic -shared -fno-gnu-linker -o test.so test.f
- Next, we need to use the R function dyn.load to load the shared library test.so. if(!is.loaded("myhadamaproduct")){ dyn.load("./test.so") } The R function is.loaded is to check if the Fortran subroutine myHadamaProduct is already be loaded to R. If yes, then we do not need to loaded it again.
- Next, we use the R function .Fortran to call the Fortran subroutine myHadamaProduct. For example, x<-matrix(1:10,nrow=5, ncol=2) # get a 5x2 matrix y<-matrix(1:10,nrow=5, ncol=2) # get a 5x2 matrix out<-matrix(0, nrow=5, ncol=2) # initialize output matrix # to format matrix or array, use function storage.mode() storage.mode(x)<-"double" storage.mode(y)<-"double" storage.mode(out)<-"double" nr<-as.integer(nrow(x)) nc<-as.integer(ncol(x)) # Fortran is *NOT* case-sensitive. So it will change the all characters # to lower case. Thus, to use .Fortran call Fortran subroutines, you # have to type lower case. Otherwise, R will prompt error message. res<-.Fortran("myhadamaproduct", x, y, nr, nc, out=out) cat("Hadama product >>n") print(res$out)
- If you do not need to use the shared library test.so any more, you can use the R function dyn.unload to unload it. if(is.loaded("myhadamaproduct")){ dyn.unload("./test.so") }
Note:
- The Fortran program called by R must be subroutines, not functions. For the example above, myHadamaProduct is defined as subroutine.
subroutine myHadamaProduct(x, y, nrow, ncol, mo)
The arguments in Fortran subroutines are passed by address instead of by values. And not like C language, there is no "pointer" concept in Fortran.
- When you use ".Fortran" to call Fortran subroutines, the name of the Fortran subroutines must be in lower case.
- Any values returned by Fortran subroutines which are called in R must be initialized and must have the format:
# if the variable is defined as double in the Fortran subroutine
variablename=as.double(initialized values) # inside .Fortran
# if the variable is defined as integer in the Fortran subroutine
variablename=as.integer(initialized values) # inside .Fortran
# if the output is double precision matrix or array
storage.mode(variablename)<-"double" # before .Fortran
variablename=variablename # inside .Fortran
The input values must also be initialized and must have the above format. However, they can be formated before the ".Fortran" function.
- If the output is not written as variablename=variablename format (e.g. out=out in the above example), You still can get results. However, you have to use res[[5]] to refer out in the above example. In fact, the .Fortran function return a list containing all arguments of the Fortran subroutine myHadamaProduct. Since out is the 5-th argument, you can use res[[5]] to refer to the 5-th elements of the list.
- It is okay that the file test.f contains the main program.
- Sometimes, the command "dyn.load("test.so")" gets error message. This is probably caused by the environment variable "$PATH" was not set correctly. You can either add the following line to the file ".bashrc" in your home directory:
export PATH=$PATH:.:
or use the command
dyn.load("./test.so")
R has a command-line editor which allows us to retrieve and edit commands we entered before. We also can install a command-line editor in Splus.
STEP 1
If you use Bourne, Korn, Bash or Z-Shell, type the following lines into your .bashrc file which is in your home directory:
export EDITOR="/usr/local/bin/vim" export S_CLEDITOR="/usr/local/bin/vim" export VISUAL="/usr/local/bin/vim"If you use C-Shell or TC-Shell, then type the following lines into your .cshrc file which is in your home directory:
setenv EDITOR "/usr/local/bin/vim" setenv S_CLEDITOR "/usr/local/bin/vim" setenv VISUAL "/usr/local/bin/vim"If you want to use emacs instead of vi, then simply replace the vim with emacs.
STEP 2
in your home directory, type command
source .bashrcor
source .cshrcSTEP 3
type
Splus -eto invoke editor when you enter into Splus session.
The most useful editing commands are summarized in the following table:
COMMAND emacs vi backward character Ctrl-B Esc, h forward character Ctrl-F Esc, l previous line Ctrl-P Esc, k next line Ctrl-N Esc, j beginning of line Ctrl-A Esc, ^ (Shift-6) end of line Ctrl-E Esc, $ (Shift-4) forward word Esc, f Esc, w backward word Esc, b Esc, b kill char Ctrl-D Esc, x kill line Ctrl-K Esc, Shift-d delete word Esc, d Esc, dw search backward Ctrl-R Esc, ? yank Ctrl-Y Esc, Shift-y transpose chars Ctrl-T Esc, xpYou can type Splus command
?Command.edit
to get the above table.
The syntax: nohup R --no-save < input.R > output& nohup Splus < input.s > output& where input.R contains your R code and where input.s contains your Splus code.
There are different versions of Splus installed in the department computing system. Splus is installed in Hajek, Newton, Emily, and Statlab. Splus 5 Splus 6 are installed in all servers.
- For Splus 3.4, the function to load the shared libraries is dyn.load.shared instead of dyn.load. The function dyn.load is used to load the object functions such as test.o obtained by using the command "g77 -c test.f". There is also no dyn.unload function in Splus 3.4.
- For Splus 5 and Splus 6, the function dyn.load and dyn.load.shared are obsolete. Splus 5 and Splus 6 use the function dyn.open to load the shared libraries and the function dyn.close to unload the shared libraries.
In library(survival), we can find the following functions:
- as.date
Converts any of the following character forms to a Julian date: 8/31/56, 8-31-1956, 31 8 56, 083156, 31Aug56, or August 31 1956.
Example:
> as.date(c("1jan1960", "2jan1960", "31mar1960", "30jul1960")) [1] 1Jan60 2Jan60 31Mar60 30Jul60 - mdy.date
Given a month, day, and year, returns the number of days since January 1, 1960.
Example:
> mdy.date(3, 10, 53) [1] 10Mar53 - date.mdy
Convert a vector of Julian dates to a list of vectors with the corresponding values of month, day and year, and optionally weekday.
Example:
> a1<-mdy.date(month = 8, day = 7, year = 1960) > a1 [1] 7Aug60 > date.mdy(a1) $month [1] 8 $day [1] 7 $year [1] 1960 > - date.mmddyy
Given a vector of Julian dates, this returns them in the form ``10/11/89'', ``28/7/54'', etc.
Example:
> date.mmddyy(mdy.date(3, 10, 53)) [1] "3/10/53" - date.ddmmmyy
Given a vector of Julian dates, this returns them in the form ``10Nov89'', ``28Jul54'', etc.
Example:
> date.ddmmmyy(mdy.date(3, 10, 53)) [1] "10Mar53" - date.mmddyyyy
Given a vector of Julian dates, this returns them in the form ``10/11/1989'', ``28/7/1854'', etc.
Example:
> date.mmddyyyy(mdy.date(3, 10, 53)) [1] "3/10/1953"
In R, we can call C functions. For example, we have the following toy C function in the file test.c.
/***** The function is to calculate Hadama product of two matrices. out[i][j]=x[i][j]*y[i][j]. The inputs x, y and the output out are vectors, not matrices. So in R, you need to transform input matrices into vectors and transform output vector back to matrix. *****/ void myHadamaProduct(double *x, double *y, int *nrow, int *ncol, double *out) { int i, j, r, c; r=*nrow; c=*ncol; for(i = 0; i < r; i ++) { for(j = 0; j < c; j ++) { out[i*c+j]=x[i*c+j]*y[i*c+j]; } } return; }- First, we need to compile the file test.c to create a shared library, test.so say, by using the GNU C compiler: gcc -fpic -shared -fno-gnu-linker -o test.so test.c
- Next, we need to use the R function dyn.load to load the shared library test.so. if(!is.loaded("myHadamaProduct")){ dyn.load("./test.so") } The R function is.loaded is to check if the C function myHadamaProduct is already be loaded to R. If yes, then we do not need to loaded it again.
- Next, we use the R function .C to call the C function myHadamaProduct. For example, x<-matrix(1:10,nrow=5, ncol=2) # get a 5x2 matrix y<-matrix(1:10,nrow=5, ncol=2) # get a 5x2 matrix # In R, a matrix is stored by column in the memory. # However, in C, a matrix is stored by row in the memory. # So we need to transpose the matrix x, namely t(x), before # transforming it to a vector. xx<-as.double(as.vector(t(x))) yy<-as.double(as.vector(t(y))) nr<-as.integer(nrow(x)) nc<-as.integer(ncol(x)) res<-.C("myHadamaProduct", xx, yy, nr, nc, out=as.double(rep(0.0, n))) # In C, matrix is stored by row. So when transforming back, we need to # specify byrow=T. mat<-matrix(res$out, ncol=nc, byrow=T) cat("Hadama product >>n") print(mat)
- If you do not need to use the shared library test.so any more, you can use the R function dyn.unload to unload it. if(is.loaded("myHadamaProduct")){ dyn.unload("./test.so") }
Note:
- The C function called by R must be void type. For the example above, the function myHadamaProduct has to have the form:
void myHadamaProduct(double *x, double *y, int *nrow, int *ncol, double *out)
rather than
double *myHadamaProduct(double *x, double *y, int *nrow, int *ncol)
You have to let the function return values through arguments, e.g "double *out" in the above example. In fact if the arguments are pointers (e.g. *out) and you change their values they refer to within the function, then the values where the pointers refer to will be changed after calling this function.
- All arguments in the C function have to be passed by addresses instead of values. That is, all arguments have to be pointers. For the example above, you cannot change "int *nrow" to "int nrow".
The values where the pointers refer to will be changed after calling the function, if the values are changed within the function. So be careful when using pointers as function arguments.
- Any values returned by C functions which are called in R must be initialized and must have the format:
# if the variable is defined as double in the C function
variablename=as.double(initialized values)
# if the variable is defined as integer in the C function
variablename=as.integer(initialized values)
in the ".C" function (e.g. "out=as.double(rep(0.0, n))" in the above example).
The input values must also be initialized and must have the above format. However, they can be formated before the ".C" function (e.g. "nr<-as.integer(nrow(x))" in the above example).
- If the output is not written as variablename=variablename format (e.g. out=as.double(rep(0.0, n)) in the above example), You still can get results. However, you have to use res[[5]] to refer out in the above example. In fact, the .C function return a list containing all arguments of the C function myHadamaProduct. Since out is the 5-th argument, you can use res[[5]] to refer to the 5-th elements of the list.
- It is okay that the file test.c contains the main function.
- Sometimes, the command "dyn.load("test.so")" gets error message. This is probably caused by the environment variable "$PATH" was not set correctly. You can either add the following line to the file ".bashrc" in your home directory:
export PATH=$PATH:.:
or use the command
dyn.load("./test.so")
To print the R graphics directly in R, use command dev.print.
The default for `dev.print' is to produce and print a postscript copy, if `options("printcmd")' is set suitably.
`dev.print' is most useful for producing a postscript print (its default) when the following applies. Unless `file' is specified, the plot will be printed. Unless `width', `height' and `pointsize' are specified the plot dimensions will be taken from the current device, shrunk if necessary to fit on the paper. (`pointsize' is rescaled if the plot is shrunk.) If `horizontal' is not specified and the plot can be printed at full size by switching its value this is done instead of shrinking the plot region.
If `dev.print' is used with a specified device (even `postscript') it sets the width and height in the same way as `dev.copy2eps'.
For `dev.copy2eps', `width' and `height' are taken from the current device unless otherwise specified. If just one of `width' and `height' is specified, the other is adjusted to preserve the aspect ratio of the device being copied. The default file name is `Rplot.eps'.
Example:
plot(hist(rnorm(100))) # plot histogram options("printcmd"="lpr -Poptra") # set default printer dev.print() # print the histogram to printer optraYou can use the command abline in R. For example, you want add to the current plot a horizontal line at y=1, a vertial line at x=3, and a line with intercept 2 and slope 0.5. You can use the following command:
abline(h=1) abline(v=3) abline(a=2, b=0.5)Below are some instructions for installing an R package into your own disk space (so that you don't need to ask the busy systems manager).
To install a package (in Unix) which is not part of the main distribution of R, follow the steps below.
- go to http://www.r-project.org or a local mirror site http://cran.stat.sfu.ca and get the source as a gzipped tar file, an example is the package sspir_0.2.3.tar.gz for State Space Models in R
- extract from the tar file with (say under your ~/tmp directory) mkdir ~/tmp # if directory doesn't already exist mv ~/sspir_0.2.3.tar.gz ~/tmp cd ~/tmp tar xzvf sspir_0.2.3.tar.gz
- compile the source (typically C and/or fortran routines) and install into your local directory (say ~/Rlib) with the following Unix command line (where you replace $HOME with your home directory which is the output of 'echo $HOME'). R CMD INSTALL --library=$HOME/Rlib sspir To use the package, you need the lib.loc option for library() > library(sspir,lib.loc="$HOME/Rlib") > library(help=sspir,lib.loc="$HOME/Rlib")
- With newer versions of R, the above can be combined into one step R CMD INSTALL --library=$HOME/Rlib sspir_0.2.3.tar.gz
- If you decide later you don't want the package, then from the Unix command line R CMD REMOVE --library=$HOME/Rlib sspir
- If you want to let others use your locally added packages, just set permissions appropriately to $HOME/Rlib, e.g. chmod -R og+rX $HOME/Rlib
- Note that the different flavors of Unix on our network. A package compiled in one computer (e.g. 32-bit Linux) should work on another computer with the same architecture. If you work on different servers on our network, then you would have to compile separate versions. In this case, one possibility is something like subdirectory Rlib_linux32, Rlib_linux64, Rlib_solaris64 under your $HOME
- Alternatively, after testing the package, you can ask the systems manager to install it (be clear whether you want the Solaris or Linux version) by providing the following instructions (where you replace $MYRPKGTARDIR with the directory where the tar file is unpacked, and replace $PKG with the name of the package) cd $MYRPKGTARDIR R CMD INSTALL $PKG
As a final note, if you want to install a package in Windows, the simplest thing to do is:
- go to http://www.r-project.org/ and get the zip file with the Windows compiled version
- unzip the file under $RHOME/library, where $RHOME is the folder where you installed R
- if you don't have write access to $RHOME, just unzip the package anywhere and use library() with lib.loc argument to load the package later
- Alternatively, use the installer in the R console menu.
- SiZer -- Exploring Structures of Curves by Lindsey Turner
- Functional Data Analysis in R, S-PLUS, Matlab. FDA workshop slides.
the foreign package provide several functions to read data stored by Minitab, S, SAS, SPSS, Stata,....
data.restore Read an S3 Binary File lookup.xport Lookup information on a SAS XPORT format library read.dta Read Stata binary files read.epiinfo Read Epi Info data files read.mtp Read a Minitab Portable Worksheet read.S Read an S3 Binary File read.spss Read an SPSS data file read.ssd obtain a data frame from a SAS permanent dataset, via read.xport read.xport Read a SAS XPORT format library SModeNames Read an S3 Binary File write.dta Write files in Stata binary formatFor example, the data file test.dat is:
4188418000628; 1 ; 05-19-2002 ; 06-23-2002 ; 26.6; 3.71; 3.03; 0 4188418000628; 1 ; 05-19-2002 ; 07-15-2002 ; 28.1; 3.41; 2.79; 0 4188418000628; 1 ; 05-19-2002 ; 08-15-2002 ; 32.0; 3.43; 3.30; 0The field is separated by ";" and the third and fourth columns are time data.
- Read time data as characters.
y<-read.table("test.dat", sep=";", as.is=T, strip.white=T)
and we can get
> y$V3
[1] "05-19-2002" "05-19-2002" "05-19-2002"
The argument strip.white is used only when sep has been specified, and allows the stripping of leading and trailing white space from `character' fields (`numeric' fields are always stripped). If strip.white=F, then we will get
> y1<-read.table("test.dat", sep=";", as.is=T)
> y1$V3
[1] " 05-19-2002 " " 05-19-2002 " " 05-19-2002 "
The default behavior of read.table is to convert character variables (which are not converted to logical, numeric or complex) to factors. When as.is=T, read.table will not convert character variables to factors.
- Convert characters to a Julian date by using the function as.date in library(survival) library(survival) > a<-as.date(y$V3) > a [1] 19May2002 19May2002 19May2002 > b [1] 23Jun2002 15Jul2002 15Aug2002 > a[1]-b[1] [1] -35
You can use R command format. For example
round(0.10000, 3)produces
0.1
instead of
0.100
. To get correct format, we can use the following command
format(round(0.10000,3), nsmall=3, digits=3)Note that the return value of the above command is a character string "0.100", not a numerical value.
A helper application is a program external to the browser that will open its own window or terminal to display results. A helper application is not the same ias a plugin. A plugin is loaded by the browser process data internally and render the results within the browser window (e.g. Acrobaty Reader plugin for PDF files).
This FAQ does not cover the installation of plugins; you have to go elsewhere for that.
If you want Firefox to autmatically use an external helper program to process files of a particular type (characterized by a filename extension or MIME type) whenever you click on a link to that file, these are the steps you can perform.
Manual Method
- Step 1 (optional): backup your existing Firefox MIME database in case you screw it up. You can also delete the file and let Firefox rebuild it if things go wrong. cd ~/.mozilla/firefox/user-profile cp mimeTypes.rdf mimeTypes.rdf~ # Now you can edit this file ... vi mimeTypes.rdf
- Step 2: add the MIME type to the list of helpers Firefox should handle. If the <RDF:Seq ... </RDF:Seq> tag already exists, only add the middle line. <RDF:Seq RDF:about="urn:mimetypes:root"> ... <RDF:li RDF:resource="urn:mimetype:application/testapp"/> </RDF:Seq>
- Step 3: associate file extensions with this MIME type: <RDF:Description RDF:about="urn:mimetype:application/testapp" NC:editable="true" NC:value="application/testapp" NC:description="Description of MIME type"> <NC:fileExtensions>ext1</NC:fileExtensions> <NC:fileExtensions>ext2</NC:fileExtensions> ... <NC:handlerProp RDF:resource= "urn:mimetype:handler:application/testapp"/> </RDF:Description>
- Step 4: inform Firefox this MIME type is automatically handled by an external application. <RDF:Description RDF:about="urn:mimetype:handler:application/testapp" NC:alwaysAsk="false" NC:useSystemDefault="false" NC:saveToDisk="false"> <NC:externalApplication RDF:resource= "urn:mimetype:externalApplication:application/testapp"/> </RDF:Description>
- Step 5: inform Firefox which external application to use: <RDF:Description RDF:about="urn:mimetype:externalApplication:application/testapp" NC:path="executable" />
For steps 2 and onward, snippets should be placed before the final line
</RDF:RDF>You should replace the example values above with your particular values. For example, to view postscript files using ghostview (gv), you would replace
- application/testapp with application/postscript.
- ext1 with ps. Optionally, you could also replace ext1 with eps for excapsulated postscript, or you can leave that out.
- executable with gv or /usr/local/bin/gv.
- Description of MIME type with PostScript file.
Plugin Method
A much easier way, if you have the ability to install Firefox plugins, may be to install the MimeEdit plugin, which gives the user the ability to associate MIME types with application that can operate on them using a GUI. It can be found here
https://addons.mozilla.org/en-US/firefox/addon/4498
From within the campus, the AMS MathSciNet publication database can be accessed directly at
http://www.ams.org/mathscinet/
Due to the fact that this database is a paid service via a subscription fee, direct access is only available from campus networks. However you can access MathSciNet from off-campus (e.g. ADSL connection from home) by proxying your request through the UBC Library system. You must have a valid library card to validate your request. The instructions on how to accomplish this are here:
http://www.library.ubc.ca/home/proxyinfo/proxyhelp.html
A browser will usually check to see if another instance of itself is running, and will refuse to start (or use your regular profile) if it believes that this is the case. It does this to ensure consistency of its database (bookmarks, browsing history, etc.) which it can't guarantee if another browser is modifying the same data it is reading from or writing to.
A browser will check that it is not stepping on its own toes by checking the existence of a lock file. A lock file is created whenever a browser starts to run to warn other potential instances of itself not to start running.
However, problems may arise if the original instance of the browser crashes or ends abnormally, and does not get the chance to remove the lock file. The lock file is located at
Firefox: ~/.mozilla/firefox/<profile-directory>/lock Netscape: ~/.netscape/lockThese file are symbolic links (not regular files) that will point to the host and process-id that created the lock file. You can glean this information by doing
ls -l <lockfile> Example output: lrwxrwxrwx 1 smith wesson 18 Jan 12 15:54 lock -> 12.34.56.78:+21321If you cannot run a browser because of this exclusivity constraint, first make sure that there really isn't another instance running on another terminal or hiding on your desktop. You can also check to see that it really doesn't exist by logging on to the host the lock file claims the browser it is running on and doing
ssh 12.34.56.78 -l smith ps -p 21321If this process exists, you can either find where it is displaying to and stop it, or you can kill it by doing
kill 21321If the process does nto exist, or the lock file is still there, you can now remove it:
rm <lockfile>Try starting your browser now. If you still can't start it up, Email the IT staff.
On the server side:
1. Start a new screen session:
screen -S NewScreenSessionName
2. Start an xpra server using a four digit display number:
xpra start :FourDigitNumber
3. Start firefox running inside the xpra server:
DISPLAY=:FourDigitNumber firefox &
4. Detach from the current screen session:
Ctrl + a + d
5. If you want to re-attach to the screen session, run "screen -ls" to list all of the current screen session(s) and then
run: "screen -r FullScreenSessionName" to re-attach to the screen.
6. To terminate a screen session, type:
exit
7. To stop the xpra server on the display number:
xpra stop :FourDigitNumber
On a Windows or Linux client:
1. Ensure that xpra is installed. If not, go to xpra.org to download the package and install it.
2. Use ssh to attach a Linux client to the xpra server which has firefox running:
xpra attach ssh:YourUserName@ServerName:FourDigitNumber
(If you run into any perl error, just run the command again and the GUI of the remote application will be open)
3. For a Windows client, open the xpra application and fill in the required fields to attach to the xpra server.
Updated Jan 2010
For Home use: Windows XP/7/Vista, Login using account with Administrator privilege
Remove Sophos first.
http://support.microsoft.com/kb/307895
Download and install Microsoft software.
http://www.microsoft.com/Security_Essentials/
Yes. UBC ITServices has purchased a software license for the Sophos AntiVirus software. All students, staff and faculty can download a copy and use it. Versions can be found for all flavous of Windows (95/98/Me/NT/2000/XP/2003) as well as most flavours of MacOSX (8/9/OSX/OSX 10.2 and above).
In order to download the installation kit, you first have to create a Campus Wide Login (CWL) account that verifies that you are an eligible member of the University. This can be done by going to this page and following the registration instructions to create a CWL account:
http://www.cwl.ubc.ca/
Remember the account details since you can use this CWL account in the future for other University web application that uses CWL or for downloading another copy for another machine.
When you have created the CWL account, you can then go to the UBC Software Download website and go through the procedure to download your copy of the Sophos AntiVirus software. The download site is here:
http://download.ubc.ca/
Installation instruction ought to be included but another set of installation and usage instructions can be found here:
http://www.itservices.ubc.ca/services/software/antivirus/sophos.html"
There are various problems associated with Adobe's PDF plugin for browsers (nppdf.so). Benign problems are the inability to print or produce printable Postscript files. More serious problems are crashing or an unwillingness to deal with different document versions.
xpdf is generally more robust. If you are on a UNIX/linux system then in $(HOME)/.mailcap, include a line with
The advantage of this approach is the 'xpdf' is the viewer for all browsers (firefox, mozilla, lynx etc) and email software (mutt, pine, thunderbird etc).
If you are using a different environment, then to configure firefox to use xpdf instead of the Acrobat plugin,
- Let Firefox show you plugins:
- Type "about:config" in the URL window.
- Look for the browser.download.hide_plugins_without_extensions option.
- Right-click over true and toggle this value to false.
- Disable plugin and use xpdf instead:
- Go to the Edit / Preferences / Downloads / View and Edit Actions menu.
- Double-click the application/pdf file type.
- A window will pop up asking how to handle PDF files: select Open them with this application.
- Another file chooser window will pop up: enter /usr/local/bin/xpdf into the filename field, then click Open.
- This will bring you back to the previous window: press OK here.
- This will bring you back to first menu: click Close here.
- You are done: test by going to a clicking onto a PDF link.
When you start TeXnicCenter, it will start to run the configuration:
- Configuration Wizard - Welcome
Click [next]
- Configuration wizard - Distribution Directory C:\Program
Files\MiKTeX 2.7\miktex\bin
click [next]
- Configuration Wizard - PostScripts-Viewer
leave everything blank and just click [Next]
- Configuration Wizard - Finish
click [finish] to finish
- For math symbols in the running text, you can use bm{} command.
Example:
...$bm{y_{ij}}$ is the response... The bm macro is different from the mathbf command in that it emboldens everything including symbols. - For math symbols in the equation or eqnarray environment, use a pair of environments: begin{boldequation} formula end{boldequation} begin{boldequation*} formula end{boldequation*} The unstarred form has automatic referencing and is numbered, while the starred form has no automatic referencing and numbering.
Add
\usepackage{setspace} \doublespacingto the preamble. The whole document will be double-spaced including bibliography. Footnotes, figures, and tables will still be single-spaced. If you want a part of the text still be single-spaced, include the part in the environment:
\begin{singlespace} \end{singlespace}If you want to have other spacing effect for a part of the text, you can use the environment:
\begin{spacing}{space}...\end{spacing}
. For example, to reduce the linespacing in the bibliography and table of contents, you can use the following command
\begin{spacing}{0.9} \tableofcontents \end{spacing} ... \begin{spacing}{0.9} \bibliographystyle{plain} \bibliography{refs} \end{spacing}The other two commands provided by the
setspace
package are
\singlespacing
and
\onehalfspacing
You can also change the other spacing by using the \setstretch command, e.g. \setstretch{1.8}. To get single-spaced, one-and-half-spaced, and doublespaced effects, you can also use \setstretch{1}, \setstretch{1.5} and \setstretch{2} respectively.
LaTeX2e Information
OnLine Documentation About:
- LaTeX2e Local Guide
- Additional LaTeX2e Documents
(in PostScript):
- UBC Statistics Dissertation Document Class
- LaTeX2e WWW links
UBC Thesis Style Format
- Located under /opt/texmf/bin/Thesis
- Just copy the 4 files in that directory
(and fill in the blanks!!)
- Carefully read the thesis.tex file
LaTeX2e Local Guide
- local.ps (a local guide to use of LaTeX2e on the departmental research network)
Additional LaTeX documentation in .ps format
- Introduction to LaTeX2e
- essential.ps: a short introduction to the most important commands
- usrguide.ps: overview on the new commands relative to LaTeX 2.09
- Graphics
- grfguide.ps: macros for including postscript images, color and much more. This file is created by running LaTeX on grfguide.tex and dvips grfguide.
- Tools
- afterpage.ps: causes the commands specified in its argument to be expanded after the current page is output.
- array.ps: A new implementation of LaTex's tabular and array environment.
- dcolumn.ps: This package defines a system for defining column of entries in an array or tablular which are to be aligned on a ``decimal point''.
- delarry.ps: implicits \left \right pairs.
- enumerate.ps: gives the enumerate environment an optional argrument which determines the style in which the counter is printed.
- fileerr.ps: deal with ``File not found error''.
- ftnright.ps: Footnotes in a multi-column layout.
- hhline.ps: produces a line like \hline, or a double line like\hline\hline except for its interaction with vertical lines.
- indentfirst.ps: makes the first line of all sections ec, be indented by the usual paragraph indentation.
- layout.ps: displays page layout variables.
- longtable.ps: defines the longtable environment, a multi-page version of tabular.
- multicol.ps: improved typesetting in several columns
- rawfonts.ps: provides emulation of LaTex 2.09 documents which used low-level commands such as \tenrm.
- showkeys.ps: displays the internal labels with \ref, \cite etc.
- somedefs.ps: allows package writers to provide options which switch definitions on and off.
- tabularx.ps: a new environment which takes the same argument as tabular, but modifies the width of certain columns, rather than the inter column space, to set a table with the requested total width.
- theorem.ps: an extension of the LaTex theorem environment.
- varioref.ps: similar to \ref but adds an additional page references, like `` on the facing page'' or ``on page 27'' whenever the corresponding \lable is not on the same page.
- verbatim.ps: reimplements the LaTeX verbatim and verbatim* environments.
- xr.ps: implements a system for external references.
- xspace.ps: saves the user from having to type \ or {} after most occurrences of a macro name in text.
- Advanced topics
- clsguide.ps: LaTeX2e for class and package writers
- fntguide.ps: the New Font Selection Scheme for class and package writers
- cfgguide.ps: configuration options for LaTeX2e
UBC Statistics Dissertation Document Classes
- Documentation
- ubc-example_m.ps: as a sample dissertation; has been obtained by running LaTeX on ubc-example_m.tex
- Source Code
- ubc-example_m.tex: source code for the sample Master Degree dissertation
- ubc-example_p.tex: source code for the sample PhD Degree dissertation
- Some useful WWW links:
- LaTeX2e command reference (the University of Pennsylvania)
- Cambridge University TeX related documentation
- UK TeX Users Group with TeX and (in particular) LaTeX FAQs
- TeX page from the UPenn Math Department
- LaTeX bugs database
- LaTeX Reference
Use vspace command in the author command. Example:
leftheader{textsc{Presentation using textsc{pdf}LaTeX, and FoilTeX, class}} %make a left header %rightheader{textsf{thepage}} %make a right header MyLogo{Eugenia and Weiliang, UBC Stats} %make a left footer %rightfooter{} %make a right footer title{shadowbox{Presentation using textsc{pdf}LaTeX, and FoilTeX, class}} % the document title % the author author{vspace{2cm}\r Latex Smart \r 6356 Agricultural Road\r University of British Columbia\r Vancouver BC \r V6T 1Z2} % the date date{today} begin{document} thispagestyle{empty} setcounter{page}{0} maketitle
A1) Method 1:
      a) first include "usepackage{fancybox}"
      b) then use
           slideframe{shadow} or
           slideframe{double} or
           slideframe{oval} or
           slideframe{Oval}
         to change frame style or use
           slideframe{none}
         to create slides without frame
     note: put these commands in the preamble will cause all slides have
the same frame unless you use another slideframe command to change it.
The above commands can be used within any begin{slide}...end{slide}.

  Method 2:
    a) first include "usepackage{semcolor}"
    b) then use
      slideframe{scplain} or
      slideframe{scshadow} or
      slideframe{scdouble} or
slideframe{none} You can use the package "natbib". The following is an example:
documentclass[12pt]{article}
usepackage[super, sort]{natbib}
bibpunct{(}{)}{;}{a}{,}{,} % required for natbib

begin{document}

Use the natbib package with options texttt{super} and texttt{sort},
and use verb+citep+ or verb+citet+
instead of the command verb+cite+. In detail, we need to include the
natbib package
and include the line

begin{verbatim}
bibliographystyle[super, sort]{natbib}
bibpunct{(}{)}{;}{a}{,}{,}
end{verbatim}

in the preamble.

And use the bibliographstyle texttt{plainnat}, i.e.
verb+bibliographystyle{plainnat}+.

The command
verb+citet+ is for ``last name (year)'' and verb+citep+ for
``(last name, year)'' which will be shown in the text.


The result of verb+citep{GoossensEtAl:1999}+ is citep{GoossensEtAl:1999}.
The result of verb+citetcitet{GoossensEtAl:1999}+ is citet{GoossensEtAl:1999}.

bibliographystyle{plainnat} % required for natbib
bibliography{workshop}

end{document}
The content of the file "
workshop.bib
" is below:
@book{GoossensEtAl:1999,
  author="{Goossens, M.} and {Rahtz, S.} with {Gurari, E., M.} and {Moore, R.} and {Sutor, R.  S.}",
  title="The LaTeX, Web Companion",
  publisher="Addison-Wesley",
  year="1999"
}
You can copy the above two files to your computer and compile them to see the
.
To make PDF documents from a TeX or LaTeX source, use one of these commands:
pdftex file.tex ... or ... pdflatex file.tex
substituting file.tex for the filename of your TeX/LaTeX sources. The output ought to be be in
file.pdf
Below are ways to get from TeX/LaTeX to a pdf file. These approaches are highly recommended over the use of ps2pdf, which does a bitmap conversion (resulting in a huge pdf file that is not searchable by words).
- Converting latex: pdflatex without graphics
- Converting latex: pdflatex with graphics
- ps2pdf, epstopdf
- Converting dvi to pdf: dvipdfm
Converting latex: pdflatex without graphics
Just run pdflatex.
Converting latex: pdflatex with graphics
To include figures in latex, the "best" approach is with the graphicx package:
   \documentclass{article}
   \usepackage{graphicx}
or
\documentstyle[graphicx]{article}
Then figures are included with something like
   \includegraphics[angle=-90,totalheight=4in]{plot}
   \includegraphics[totalheight=4in]{plot}
   \includegraphics[totalwidth=6in]{plot}
or
   \includegraphics[width=3in, height=4in]{plot}
   \includegraphics[width=7.5cm, height=10cm]{plot}
The use of \totalheight or \totalwidth is preferable in order that text characters are proportional and not squished in one direction.
Just run pdflatex or latex. For the above, pdflatex assumes a file plot.pdf exists, and latex assumes a file plot.ps exists
Converting figures as ps files to pdf: ps2pdf, epstopdf
To convert a figure from postscript (ps file) to pdf, use the ps2pdf command. If this fails, then try epstopdf. This conversion is needed to include graphics for pdflatex. In pdflatex, graphics types allowed are pdf and png, but not ps.
Converting dvi to pdf: dvipdfm
dvipdfm is currently only available on the Linux computers, not the Solaris computers.
dvipdfm converts a dvi file directly to pdf, without changes in the TeX/LaTeX file. The resulting file is searchable. Different graphics type (eg., jpeg, gif) can be used with the graphicx package in LaTeX; these cannot be seen with xdvi but they can be seen from acroread after the dvi file is converted to pdf.
Sometimes dvipdfm works better than pdflatex (e.g., slides using the 'seminar' style).
This is a list of common TeX/LaTeX errors that I see when reviewing manuscripts. Also some shortcuts are given to make math equations more readable (and easier to edit).
Note the \def (or \newcommand) should appear at the beginning of your tex file (before \begin{document} in LaTeX).
- If you look carefully at math writing, variables are printed in the italics or slanted font. However something like the exp or log function is not a variable, so it is in standard font, even within math mode. That is, \exp, \log, \sin etc are used for math and trigonometric functions. For statistics, \Pr is a definition for probability of an event, but \E for expectation and \Var for variance, etc, are not defined.
However, you can define these yourself with something like
\def\Var{\mathop{\rm Var}}or
     \def\Var{{\rm Var}\,}
     \def\E{{\rm E}\,}
The first version does not work well for E.
- Math expressions with subscripts and superscripts should also be put in math mode, e.g., $a$, $x=1$, $-1$. In non-math mode, - is a hyphen (shorter than minus sign, -- is an en dash (e.g. for pp. 34--43), and --- is an em dash — for use in a middle of a sentence.
- Unless you are in displayed math mode, fractions should usually be expressed with a solidus, for example $x_i/n$ and not $\frac{x_i}{n}$ or ${x_i\over n}$.
- Use a definition for any math symbol with a 'hat', 'bar', 'tilde' etc. This will make equations easier to read in TeX. Same thing for symbols for equal in distribution, convergence in probability, etc. Examples are:
\def\phat{{\hat p}} \def\Fbar{{\overline F}} \def\atil{{\tildealpha}} \def\inprob{\rightarrow_p} \def\eqd{\,{\buildrel d \over =}\,} \def\law{\rightarrow_d} - boldface Greek in scriptsize: LaTeX may not automatically resize a symbol when it is a subscript of superscript. Hence def are needed for scriptsize characters, e.g.
  \def\thbf{\mbox{\boldmath $\theta$}
  \def\thbfs{\mbox{\scriptsize \boldmath $\theta$}}
  $$f(\thbf) =2^{\thbfs}$$
Alternatively, use the ams packages amsmath and amssymb
\def\dbfams{\boldsymbol{\delta}} \def\mubfams{\boldsymbol{\mu}} - labelling of equations, and theorems, lemmas, corollary:
To get the section number to appear in an equation, add (to the beginning):\renewcommand{\theequation}{\thesection\.\arabic{\equation}}and add
\setcounter{\equation}{0}at the beginning of each section.
To get Theorems, Lemmas, Corollaries to be on the same numbering scheme, by section, add:
\newtheorem{\theorem}{Theorem}[section] \newtheorem{\lemma}[theorem]{Lemma} \newtheorem{\corollary}[theorem]{Corollary} - larger brackets[], braces{}, parentheses(): these should be used around summations, fractions etc. It is simplest to use \left[, \right] etc, but left and right only work if your equation is not split into more than one line. In the latter case, use one of \bigl, \Bigl, \bbigl, \Biggl (and corresponding \bigr on the right).
Sometimes one needs a larger '/' or '|'. For '/', use \bigm, \Bigm etc. For '|', use \bigl, \bigm, \bigr etc depending on whether it is left, middle or right.
You can use either floatflt package or wrapfig package.
For example:
\begin{floatingfigure}[r]{0.4textwidth}
\centering
\includegraphics[width=0.4textwidth]{lake1}
\caption{Text wrap around figure}
\noindent \hrulefill
\label{test}
\end{floatingfigure}
and
\begin{wrapfigure}{r}{0.4textwidth}
\centering
\includegraphics[width=0.4textwidth]{lake1}
\caption{Text wrap around figure}
\noindent \hrulefill
\label{test}
\end{wrapfigure}
The difference between floatingfigure and wrapfigure is that the text typed after end{floatingfigure} will be forced to be a new paragraph.
For more information, please refer to floatflt manual and a webpage about wrapfig.
There is a class file for LaTeX2e that helps you produce a properly formatted UBC thesis. It's not officially supported by UBC but has been endorsed by FoGS as mentioned on their webpage. The download link can be found in the LaTeX section there.
Just in case the FoGS website is down here is a direct download link provided by Michael McNeil Forbes, the author of the class file and a former UBC graduate student.
Another way to add printer is use "Bonjour", IPP or TCP/IP printer.
TCP/IP method:
Name: hp5.stat.ubc.ca
IP: 142.103.175.193
Model: Duplex, HP Laserjet M605 dn
Mailroom
Optra: optra.stat.ubc.ca
IP: 142.103.175.197
Model: Duplex, HP Laserjet M605 dn
ESB 3163
Mac OSX:
System Preferences -- Printers & Scanner -- + -- IP --
Address 142.103.175.193
HP JestDirect Socket
Queue Leave it empty
Name hp5
Location Mailroom
Use Select Software
Postscript
Add
NOTE: If you don't see "Postscript" software you need to follow instruction below.
Download new driver for HP Laserjet M605 and install on your computer first.
https://support.hp.com/ca-en/drivers/selfservice/hp-laserjet-enterprise-...
Install the driver and then add the printer. You will see the HP M605
After this, Configure the HP5 to add Duplex option for duplex printing.
Keep everything else as Default setting.
Windows 7: http://www.tp-link.com/lk/article/?id=240
Windows 8: http://www.tp-link.us/article/?faqid=459
In Windows 8, Swipe from the right to left, click on Search " Advance Printer Setup"
If you have a properly formatted file (i.e. it's text or a Postscript file that has been formatted for Letter (8.5"x11") size paper) but the output has been shifted right and/or down, it's likely that the printer is mistaken about the size of the paper in the print hopper.
The print hoppers has a slider that signals the printer on the type of paper loaded within (such as Letter, Legal, etc). It does this by moving fingers or knobs located on the side of the hopper that press against contacts within the printer. Sometimes either the fingers or the contacts are stuck and the printer is misinformed about the size of the paper. When a Letter size printout is being printed, the printer tries it best to print on the wrong size paper, thus the off-centered output.
The fix is two unstick the fingers or contacts so that the printer has the correct paper sizing information. If you don't know how to do this, contact the IT staff.
Two-up printing is where 2 pages are printed on one side of a paper by shrinking them, putting them side-by-side on a landscape format paper.
This is the usual default for printing text files. To disable this, you'll need to convert it to Postscript, as Postscript files are printed without reformatting:
textps file.txt | lpr -Pprintername
If you have a Postscript file, you can reformat them into a 2-up format (or even 4-up format if your eyesight can stand the strain) by filtering them through the psnup tool:
psnup -2 file.ps | lpr -Pprintername psnup -4 file.ps | lpr -Pprintername
You can combine the above two solutions to print text in a 4-up format:
textps file.txt | psnup -4 file.ps | lpr -Pprintername
For Windows users, some printer drivers will allow you to set 1-up, 2-up, 4-up and booklet format.
If a printer is out of paper (the hoppers are empty and there no packages of new paper to be found near the printer), then a fresh package or box of paper can be fetched from the mail room. Before you take some paper, please notify the Font Desk Receptionist so that the inventory can be kept up to date. If possible, please take an entire box so that this tiresome exercise need not be repeated often.
If the printer reports in the LCD window that it is low on toner, then what to do depends on how fresh this message is. The toner sensor is very conservative and will report "Low Toner" even though there is plenty of life left. To ascertain whether the toner is really running out, print a test page. If the printout is getting very light or has bald patches, then open the printer, shake the toner cartridge, reinsert the cartridge and print a few test pages again. If it comes out spotty again, then it's time to change ther printer cartridge.
Contact the IT staff to replace the cartridge.
SYNTAX
lprm -Pprinter JobID
lprm - [remove all your submitted jobs.]
EXAMPLE
lprm -Plj4 316
SYNTAX
lpr -Pprinter(s) filename
EXAMPLE
lpr -Poptra example.ps [to print double sided.]
lpr -Poptras example.ps [to print single sided.]
Just drag right-button of the mouse.
You can use command a2ps. For example, if you have a text file called input.txt and you want to print the file 4 pages per sheet, then you can use the following command to generate an output file called output.ps, then use lpr command to print the output.ps
a2ps -o output.ps -4 input.txt
lpr -Pprintername output.ps
Note that
- a2ps convert FILE(s) or standard input to PostScript. Input files can be of different type, e.g. .txt, .ps, or .html.
- you can directly print out the input file to printer by the following command:
a2ps -P -4 input.ps
However we recommend to convert the input file to output.ps first, then use ghostview to check if the format is correct or not. Finally use lpr command to print output.ps.
- For further information, please use command man a2ps to read the manual of the command a2ps.
A4 format is commonly used in the rest of the world, so it's not surprising to receive DVI or Postscript files from there. If you try to print in on our printers which are set up for Letter size (8.5"x11"), you may end up with less than satisfactory results.
If you have the TeX/LaTeX source, you can change the source to use the new format and run TeX/LaTeX again.
You can also resize the Postscript output (if you have a DVI file, convert it to Postscript first), by issuing the command
psresize -PA4 -pletter in.ps out.ps
and print the resulting file out.ps.
If this is for publication that requires it to be on A4 paper, you can buy A4 paper from the UBC Bookstore. Ask the IT staff on how to set up the printer to print on A4 paper.
Convert dvi file to ps file then use lpr command to print the converted ps file:
dvips -o outputfilename.ps inputfilename.dvi
lpr -Pprintername outputfilename.dvi
Or pipe it through directly:
dvips filename.dvi | lpr -Pprintername
As of Dec. 1, 2005, if you do not set the printer your printouts should go to, it will be thrown away. The method to set your printer is different for Windows and Unix (Linux or Solaris).
For Windows
-
Setting a printer for an individual print job
Most Windows applications will allow you to choose the printer from a menu when you try to print something. Choose the appropriate printer.
-
Setting a printer for a session
To set a default printer for a login session (i.e. this setting will be forgotten once you log out), you can go to the printer settings control panel:
Start -> Settings -> Printers
then bring up the printer menu by placing the mouse over the printer's icon you want to print to and right-click, then select
Select As Default Printer
A check mark should appear over the printer icon of your choice.
-
Setting a permanent default printer for a workstation
To set a permanent default printer (for the workstation you are using: you'll have to repeat it for another workstation), go to
Start Menu -> Run ...
Then, type the following into the text input window:
\samba\win-share\SetDefaultPrinter
Then double-click the appropriate printer batch file. From then on, that will be your default printer for this particular workstation.
For Unix
-
Setting a printer for an individual print job
Some application (like firefox) will allow you to choose the printer. Most printing is done from the command line via lpr. You can tell lpr where to send the output to via the -P switch:
lpr -Pname file ...
-
Setting a printer for a login session
To set a default printer for a login session (i.e. this setting will be forgotten once you log out), you can set the environment variable PRINTER. In tcsh (the default shell), you can enter
setenv PRINTER name
- Setting a permanent default printer for your MathNet Unix account
To permanently set a default printer for your Unix sessions, you can enter the above command to set your PRINTER environment variable in your startup script, found in your home directory:
~/.login
PDF FILES
First use acroread to open the file. Then use acroread's "print" menu.
JPG AND GIF FILES
First use Firefox to open the file. Then use Firefox's "print" menu.
For text files, you can first convert them to ps files before you print them. You can use Unix command "enscript" to do this. Enscript converts text files to PostScript and spools gen- erated PostScript output to the specified printer or leaves it to file. If no input files are given, enscript processes standard input. Enscript can be extended to handle dif- ferent output media and it has many options which can be used to customize printouts (Use command "man enscript" to find more information).
SYNTAX:
enscript [options] filename
OPTION EXAMPLES:
         -1, -2, --columns=num
                 Specify how many columns each page have.  With  long
                 option  --columns=num  you  can  specify more than 2
                 columns per page.

         -a pages, --pages=pages
                 Specify which pages are printed.  Page specification
                 pages can be given in following formats:

                 start-end
                         print pages from start to end

                 -end    print pages from 0 to end

                 start-  print pages from start to end

                 page    print page page

                 odd     print odd pages

                 even    print even pages

         -A align, --file-align=align
                 Align separate input files to even align page count.
                 This  is  handy  for  two-side  and  2-up  printings
                 (--file-align=2).

         -b header, --header=header
EXAMPLE
          enscript foo.txt
                  Print file foo.txt to the default printer.

          enscript -2 foo.txt
                  Print file foo.txt to two columns.

          enscript -2r foo.txt
                  Print file to  two  columns  and  rotate  output  90
                  degrees (landscape).

          enscript -G2rE -U2 foo.c
                  gaudy header,  two columns,  landscape,
code highlighting, 2-up printing. Windows
To find which printer is the default printer using Windows, go to the printer control panel:
Start -> Settings -> Printers
The default printer will have a check mark over the icon.
Unix (Linux, Solaris)
Under Unix, the default printer can be found by looking at the output of
lpq
For example, the output may look like
Printer: pulp@viol 'Lexmark Optra Se3455, Rm209 (1-sided)' Queue: no printable jobs in queue Status: job 'smith@viol+232' removed at 20:15:34.286 Filter_status: done at 20:15:34.271
The default printer is named "pulp" and it's located in Rm209. The last printout was sent by user "smith" at 20:15:34. To send it to a particular printer, you can supply the "-P" flag to the print command:
lpr -Ppulp file ...
If you have a missing printout, first make sure that the printer you intended to print to to was actually the printer used (Unix: use the lpq command to see that your username was the last finished job and that the room location is what you expect). If the printout is still missing, it could be that
-
You sent it to the wrong printer. Don't just keep resending your printout without finding out what happended to it.
-
Somebody mistakenly took your output.
-
You have not set the printer that your print job should go to and sent it to the default 'null' printer. See note at top of this page.
-
The file has Postscript errors and can't be printed. Try viewing the file with Ghostscript to see if it is well formed. Also, try printing from within the same room as the printer so that you can observe the printer. If you suspect it is a Postscript error, contact the IT staff.
-
You are trying to print something other than letter size (8.5x11.0inch) paper. This is especially common with European print-ready files formatted for A4 size appear which is not commonly used in North America. You'll may have to reformat the paper in this case. Check the LCD window to see if it complains about not being able to supply the correct size paper.
-
The printer is jammed or is out of paper - the output of "lpq" will have pending jobs to be printed (and your is last in line) and the LCD window on the printer has an error condition. In this case, contact the IT staff. Unless you know what you are doing, don't try to repair it yourself.
-
You tried to print a file the printer does not understand. You ought to get a shingle sheet stating that it could not print your file format. In this case you'll need to convert the file format to something the printer can understand (like Postscript).
- Configuration screw up: if you cannot explain why a print job disappeared, contact the IT staff. We can't fix it if we don't know about it.
Most printers will print on both sides of the paper by default -- to make the print-out single-sided, try adding s at the end of the printer's name.
Update Mar 2018
Please use TCP/IP printing method
Do not use CUPS method below until further notice
Printers Info:
NOTES: Must be using wired to connect to local StatNet internal network in order to use our printers.
You can not print from UBC wireless.
Alternate how to add printer usingTCP/IP HPJetdirect Socket printing.
Print server: cups.stat.ubc.ca
http://cups.stat.ubc.ca:631/printers
I) Windows Setup
Step1:
Find out which printer you want to add here:
http://cups.stat.ubc.ca:631/printers
Look at "Description" for the printer Model.
Download PCL6 or PCL5 or Postscript driver from the Vendor site.
If your printer's Vendor doesn't have one, Windows/MacOSX/Linux operating systems comes with print drivers
installed. You should choose one of these drivers that is as close as possible to the name of the printer.
Some "Generic Postscript" driver would work but you might lose some special functionality such as Duplex, Booklet.
Do not use "Universal driver"
Install the driver and notice where you install it "c:\....)
Step2:Click on Start -- Setting -- Printer and Faxes
1. Select add a printer
2. Select add a network printer
Click on "Connect to a printer on Internet or home or office network.
3. Put in for the URL :
http://cups.stat.ubc.ca:631/printers/Printer_name
Substitute the name of the printer for Printer_name.
Click Next
4. For the print driver select correct driver which you have just
installed.
Click "Have Disk" -- Browse --
Find location of your new printer driver, Select it and OK
II) Mac Leopard / Linux /Unix:
1) Add one printer: ( Mac OSX only)
Open "Systems Preferences" -- Print & Fax
Click on "+" to open 'Add Printer' window
Click "IP" icon then enter:
Protocol: Select Internet Printing Protocol - IPP
Address: cups.stat.ubc.ca
(* "Printer_name" is the name of StatNet printer )
Queue: printers/Printer_name [ e.g. printers/hp5 ]
Name: Printer_name [ e.g. hp5, Duplex ]
Location: [ e.g. ESB mail room ]
Print Using: Select Printer Softwares (ie. HP Laserjet Enterprise M605 with Duplex option)
Check: Duplex Unit
Click Add
Repeat for each new printer.
2) If you want to have ALL StatNet public servers
WARNING Mac OSX: it will remove ALL your old printers and the removal of the previous printers is not undoable.
Add the following line to /etc/cups/client.conf as root:
ServerName cups.stat.ubc.ca
Bogofiltler needs train/retrain often to make it works 100%
See this URL for how it works
http://www.bogofilter.org/
We use the term "ham "for email you want, "spam" for email you don't want. We also assume you save your ham/spam and others email in mail/ folder. See Notes below of you only have Mail (uppercase) folder.
- Login to SUN Unix server only.
- ssh your_login@stat.ubc.ca (Be.stat.ubc.ca)
I have have a copy of spam folder for you to start training bogofilter manually.
bogofilter -sM < /usr/local/data/etc/bogofilter/spam
Second step, you need "ham" email to train bogofilter.
You can use any saved email (good known emails) as ham.
bogofilter -nM < mail/ham
or
bogofilter -nM < mail/tha
NOTES: If you only see Mail (Uppercase) folder, do this
ln -s Mail mail
Bogofiler will store your database in your home dir ~/.bogofilter/wordlist.db
Edit your .procmail file using vi or emacs or pico by typing
vi ~/.procmailrc
- Add to content below:
:0fw
| /usr/local/bin/bogofilter -u -e -p
:0e
{ EXITCODE=75 HOST }
:0:
* ^X-Bogosity: Spam, tests=bogofilter
mail/Bspam
:0:
* ^X-Bogosity: Unsure, tests=bogofilter
mail/Bunsure
# Used during vacation: forwards to vacation, then makes a cc for # myself
# Unhash 2 lines below to turn on your vacation
#:0 c
#|/usr/bin/vacation -t1d $LOGNAME
Notes: "Bunsure" and "Bspam" are two "spam" and "not sure" spam files that bogofilter saved for you in the mail folder. You need to check them often to make sure you don't have false positive or false negative. You need to sort "Bunsure" and "Bspam" into real "ham" and "spam" and "re-train "your filter to update your bogofitler database (wordlist.db)
To enable the filter type
and add this line (Note: include the double quotes " ")
:0 c
|/usr/bin/vacation -t1d $USER
If you setup your as describe above, you can setup a cronjob to update your wordlist.db hourly
crontab -e (crontab editor = vi mode. You can changes by edit your shell environment EDITOR=emacs)
0 * * * * /usr/local/bin/bgupdate > /dev/null 2>&1
Manual update:
After saving your new spam/ham form Bspam and Bunsure, run this
bgupdate
You may need to run it twice the first time.
Advance option: Personalize your bogofilter:
If you want personal configuration for bogofilter, just copy this file /nfs/packages/bogofilter/etc/bogofilter.cf.example to your bogofilter directory.
Reasons
There are many reasons that would prevent an Email from getting to its destination (whether that be your mailbox or someone else's). Here are some common reasons:
-
Wrong Email address: either the username portion or the domain portion may be wrong. A common mistake is to include specific hostname to an Email address, such as "user@host.mail.domain" when the correct Email address is "user@mail.domain". You ought to get a notice of this ("bounce message").
-
Mail too large: most places have restrictions on the size of a single piece of Email they will accept. Exceeding that limit will result in the mail being rejected. You ought to get a notification when this happens.
- Mailbox is full: our site enforce storage quotas. If your mailbox size exceeds your allotted limit, no Email can be delivered until you make more space available (i.e. delete some Email). See elsewhere in our FAQ to see how to check quotas.
-
Mail server is busy or not operational: a mail server (either sending or receiving) may not always be available to immediately deliver mail. In these cases, mail will be queued and delivery retried at periodic intervals until the receiving mail server is available. If the mail server does not respond in a reasonable amount of time, the mail will be deemed non-deliverable, and a bounce message will be sent back to the sender.
The retry interval and the total retry time policy is set by the sending Email server: at our site, mail will be retried every 4 hours for a maximum of 24 hours.
-
Blacklisting or spam/virus filtering: some sites use blacklisting, or spam or virus filtering to try to detect unwanted mail and reject them. Depending on the mail policy at the offending site, the sender may or may not be given notice that mail has been filtered.
At our site, we do employ blacklists and do virus filtering. The sender always gets a notice stating the reasons why their Email was rejected, but some Email users are not techically savvy enough to understand what's going on. If you suspect that Email being sent to you is being blocked, contact the IT staff (see below about reporting mail problems) and they may be able to suggests workarounds or remedial actions.
-
Mail being forwarded incorrectly or mail loops being formed.
-
The user has set lax permissions on their home directory. Our mail server, for example, will refuse to deliver mail to a user with a home directory that is world writable.
Most of these problems are apparent when an error message occurs (either from your mail reader or from a Email rejection notice).
How to report problems
When reporting mail problems, it is important to give as much detailed and accurate information as possible. Sometimes the only way to diagnose these problems (especially when the problem is days or weeks old) is by looking through the mail logs, and precise time/sender/recipient details are required to track the problem down. Email headers (envelope information) from Email (if available) is usually useful, and should also be included when reporting problems.
Sending large attachments via Email is an inefficient and wasteful way of disseminating information to a large group of people, as one copy is made for each recipient. It taxes the network, mail servers, disk storage of both the sender and especially the recipients, and sometimes the recipient's patience if they use a dial-up modem for their internet connection.
The typical scenario is that someone will broadcast information (and sometimes committing the double sin of formatting it in a proprietary format) to a mailing list that may contain hundreds, or even thousands, of recipients. A copy is then made for each individual recipient. So, for example, if 4 megabyte attachment is sent to a department mailing list with 250 people, an aggregate of 1 gigabyte of mail storage is used by this one message.
Some Email accounts (e.g. Hotmail, Yahoo) have size quotas, and sending large attachments to them will either fill up or severely reduce the available space for new mail.
It is also typical that not all of the recipients need or want the attachment, yet these recipients have already expended the considerable computing overhead to receive, scan or filter for spam and viruses, and store the large attachment.
A far better strategy is to post the information or file onto a web site (or FTP site if you have access to one), then Email out a short message that describes the contents and refers interested parties to the URL. This will allow people who want the data to pull the data off the web site at their leisure, and those who don't can delete the message without having incurred the overhead of receiving all the data in the first place.
Using this method with the above scenario, a 1K blurb instead of a 4Mb attachment will mean a three-orders of magnitude (1/4000th) reduction in computing resources.
Our mail server rejects Email with attachments that have filename extensions which can potentially carry malware (i.e. viruses). Any attempt to receive or send Email with such an attachment will generate an error message, along with a reference to a URL which explains the situation:
Going to that URL will give an explanation of why this is done, as well as some methods to work around this restriction.
How do I set Outgoing SMTP server?
I. Webmail:
http://webmail.stat.ubc.ca
II. Pine/Alpine or Elm/Mutt via SSH login
- If you have a SSH (secure shell) capable host, you can login to any of our blic unix hosts (e.g. be.stat.ubc.ca) and use the command line mail reader (e.g. pine).
- If you don't have SSH, but you do have network access and the ability to install software, you can download SSH from our FTP archives and install it. For example, to get the Windows SSH client, go to
http://www.math.ubc.ca/~ftp/clients/Win/Ssh2/
ftp://ftp.math.ubc.ca/client/Win/Ssh2/
III. If you have a PC with network access, you can use an Email reader such
- PC-Pine
- Thunderbird
- Apple Mail
- Outlook
to connect to our remote mail service and retrieve your Email, You must configure your Email reader to use one of 2 remote Email protocols:
1. The IMAP protocol is the preferred choice. IMAP will do operation on a remote mailbox, rather than trying to download your INBOX and doing local operations as POP/POP3 would. Our IMAP installation is also set up to access your personal mailboxes (not just your INBOX as POP3 does), thus allowing you to access the same mail as you would with WebMail or pine.
Here are the parameters you need to know:
- Protocol: IMAP
- Incoming mail server: imaps.stat.ubc.ca
- Port:
- If using STARTTLS: 143
- If using SSL: 993
- Mail Folder Prefix: (leave empty)
2. The POP/POP3 protocol is less desirable. pop/POP3 will try to download your INBOX down to your local disk. Be careful to set "Leave mail on server" or "Don not download INBOX"
- Protocol: POP/SSL
- Incoming mail server: pop.stat.ubc.ca
- Port:
- If using STARTTLS: 110
- If using SSL: 995
If you use a search engine to search for terms like the mail client you are using (e.g. "Thunderbird"), the protocol (e.g. "IMAP"), and a keyword like "setup" or "configuration" you should be able to find step by step instructions on where to input the above information. (Make sure you substitute their values for our's!)
In PINE, you can specify the outgoing message header options: To, Cc, Bcc, Fcc and Lcc.
TO
Send this message to the following e-mail address (REQUIRED).
CC (CARBON COPY)
Send a carbon copy to the given e-mail address.
BCC (BLIND CARBON COPY)
Send a blind carbon copy to the given e-mail address. There will be nothing in the message header the that indicates a Bcc: was sent. The To: and Cc: recipients will not know a copy was sent to the Bcc: recipients.
FCC (FILE CARBON COPY)
Save a copy of this outgoing message into a file. The default file is "sent-mail". You may type Ctrl+T to get a list of all your folders and select one to use as the FCC for this message.
LCC (LIST CARBON COPY)
Send a copy of the message to a list of people but avoid having all of their addresses visible, in order to reduce clutter when the message is received.
To create a list of e-mail address, select the ``ADDRESS'' submenu in the main menu of PINE. Then type ``@'' to add new e-mail list.
When you compose your e-mail message, leave the header option To: blank. And type the nickname of the e-mail list in the header option Lcc:. Each recipient in the e-mail list will receive the message without their address being visible.
You need to use Ctrl+R to turn on/off the Bcc, Fcc, and Lcc header options.
Login to Unix servers (Be.stat.ubc.ca)
$ ssh your_email@stat.ubc.ca
Type this:
$ less /usr/local/data/stat-mailaliases/aliases
and browse through to get necessary information. It will contain lines like these:
help:tha,thi,binh.dang
grads:grad
students:grad
which explain that "help" includes "hi,tha and Binh.Dand" in help group. There is no misterious difference between "grad", "grads" and "students" in our department.
Also, there will be lines like the following:
grad: :include:/etc/stat-mailaliases/grad.list
which instructs us look at the given file to get the list of people included into "grad" alias. To look at this list just pull this file on your screen by
less /usr/local/data/stat-mailaliases/grad.list
You will see a simple one-name-by-line list of all grad students' emails.
Easy way:
Go to My Stuff -> Email Forwarding/Vacation Message or click here to get there.
Brower Way:
You now have new vacation tool
http://www.stat.ubc.ca/Computing/
Email forwarding and vacation message (login first)
Notes: You must Login first AND supply passwd one more time
at the bottom "Do It" button
There are 3 category
1) Remove any previously set Email vacation/forwarding
When you come back from vacation, you need to do this
2) Set up your auto-reply message
Before you go on vacation, you need to do this
3) Forward your Email to another address
If you don't want to use our email, (external mail providers: gmail, yahoo...)
You need to do this. Do not "Keep a Copy" since you need to
clean up sometime to avoid email rejection due to "Over quota"
Manual Setup Forwarding Email:
Check if there is a file named ".forward" in your home directory.
$ls -l .forward
If there is no such file, then use any text editor (e.g. vi, emacs) to create the ".forward" file in your home directory.
Log into StatNet server.
$ ssh your_email@stat.ubc.ca
# If you want only forwarding, and don't want a local copy of the message
At your home directory, use any text editor to create the ".forward" file..
$ emacs .forward or vi .forward
your_other@email.address
OR simply run this command
$ echo 'your_other@email.address' >~/.forward
# If you want forwarding, and also keep a local copy of StatNet message. NOT recommended,
$ echo '\user_name,your_other@email.address' >~/.forward
NOTE: the '\' character is important: it disables any aliasing and prevent Email loops.
If there already exists the ".forward" file in your home directory, then it means you already setup e-mail forwarding. You can use any text editor (e.g. vi, emacs) to change the destination e-mail address.
For example, if the destination address in the ".forward" file is abc@gmail.com, and you want to change
the destination address to abcyahoo@yahoo.com. Then you can use any text editor to open the ".forward" file.
Then replace
abc@gmail.com
with
abcyahoo@yahoo.com
To deactivate, remove the above file:
$ rm ~/.forward
Email auto-replies are useful in some circumstances, but the use of this facility is not without risk. If you install an auto-reply to your Email address, please be aware of the following outcomes which you may not have considered.
The main problem associated with auto-reply systems are that they indiscriminately reply to the purported sender. Email is notoriously prone to fraud, and the sender information is frequently forged (or spoofed) by spammers, phishers, Email worms and viruses, and other ne're-do-wells. The result is that your messages could be sent to
- innocent third parties who have had their Email addresses forged;
- Email addresses that collect replies to phishing targets;
- spammers who may collect replies to confirm a working Email address;
- spamtrap addresses owned by blacklist operators -- this is a malicious attempt by an attacker to try and put a mail system onto a public blacklist to cause mail delivery problems.
- a mail domain that is a target of a denial-of service: a malicious party could generate Emails from
Such unintended replies are sometimes called "outscatter" or "backscatter"
Furthermore, even legitimate auto-replies may cause problems, such as
- mail loops: under rare circumstances, two auto-reply systems could lock themselves into a mail loop replying to each other's Email and causing one, or the other's, Email INBOX to fill up.
- mailing list: your reply notice may be sent to a mailing list yuo are subscribed to, and hundreds or thousands of other people who don't care may see your auto-replies.
There are some systems in place, both on our Email system and other mail system, that mitigate these risks:
- an efficient spam/virus filter that drops Email before they can be responded to;
- a sender tracking system that limits auto-replies to a particular Email address to (default) once per day.
- mail loop detectors;
- most blacklist operators are aware of unintentional auto-replies and will consider that before adding to a blacklist;
However, you can further reduce the risk of unintended consequences by
- realistically assessing the nature of Emails you receive and evaluating whether it is of enough importance to necessitate an immediate auto-reply (as opposed to dealing with the Email when you can get to it).
- Using some other mechanism such as Email forwarding or web notice to disseminate your intended notice.
- narrowing the scope of when auto-replies are invoked, such as only during the times when it would be useful, or only to certain senders. Contact the IT staff on how you can achieve this.
- recognizing special circumstances that would make an auto-reply system risky (target of much spam or many mailing lists) and weighing those factors against the benefits of installing an auto-reply.
For anyone has INBOX quota issue, follow these steps to archive/move the entire INBOX to their $home/mail folder so they can deal with it later. The INBOX default quota is 1Gb and the $home default quota is 10Gb.
- Quit all of their email clients (Outlook, Thunderbird, Apple Mail, Webmail etc.)
- Use VPN if user is working outside UBC. Login be.stat.ubc.ca using ssh username@stat.ubc.ca
- We have 2 separate quotas: one for user's $home directory and the other quota is for /var/mail/username (Inbox)
After ssh login, type the below command after the $ sign prompt in red text
Check inbox quota:
Assume user name is daniel:
$ ls -lh /var/mail/daniel
-rw------- 1 daniel faculty 1022M Feb 7 15:29 /var/mail/daniel
The Inbox is 1.2G, over quota of 1GMake sure user has enough $home quota:
$ pwd
/home/staff/username$ du –h .
1.0M ./mail/blah1
112K ./mail/blah2
196K ./mail/blah3
200K ./mail/blah4
1010M ./mail
1010M .This user only uses 1Gb disk for $home and most of the data are in the mail folder so they are OK to do the next step archiving (move) the Inbox.
- Move their INBOX, it will take awhile so be patient. Assume the current date is Jan 23, 2023:
$ mv /var/mail/username mail/Inbox-Jan23-2023
The Inbox should be empty once you move it to Inbox-Jan23-2023. It will NOT show in your email client on the left pane until you do the next step. - Start their email client and subscribe to the new "Inbox-Jan23-2023" and check it to make sure they can see it.
For Thunderbird How to: click here
For Outlook How to: click here
If anyone has trouble having their alias FASmail account forwarded to @stat.ubc.ca, here's user experience reported:
1. Ask UBC IT to created an alias Firstname.Lastname [at] ubc.ca (I didn't want my CWL [at] mail.ubc.ca address distributed widely, since that's my CWL id, and I don't like it being out on the interwebs too much). Make sure you have added the email address you want to forward to into your contact list: after logging in at https://www.mail.ubc.ca using your CWL account, access People menu from the top left Menu icon, then add a new entry for "Your contacts"
2. Created an Inbox rule (go to the little gear wheel on the top right of the web interface www.mail.ubc.ca) to have my FASemail forwarded to @stat.ubc.ca *BUT* there is a trick! Here's what took IT central 2 weeks of emails back and forth to figure out:
3. Split the rule into two: one to forward emails only, and another one to delete the forwarded emails, and make sure the "delete" rule is set up after the forward one.
4. If you don't do 3 above, you will have your "alias" email forwarded, but email to your CWL [at] mail.ubc.ca will disappear in thin air
5. With 3, all my FASemail (those sent to CWL [at] mail.ubc.ca and also those sent to Firstname.Lastname [at] ubc.ca) get forwarded to @stat.ubc.ca
Here is the UBC IT Howto: https://web.it.ubc.ca/forms/fasmail/
Browser way:
Go to My Stuff -> Email Forward/Vacation Message
Notes:
- If you are from outside of UBC you will need to use UBC VPN.
- You must Login first AND supply passwd one more time at the bottom "Do It" button
- If you see a button to enable "TLS 1.0 and TLS 1.1 ..." please click to proceed.
There are 3 category
1) Remove any previously set Email vacation/forwarding
When you come back from vacation, you need to do this
2) Set up your auto-reply message
Before you go on vacation, you need to do this
3) Forward your Email to another address
If you don't want to use our email, (external mail providers: gmail, yahoo...)
You need to do this. Do not "Keep a Copy" since you need to
clean up sometime to avoid email rejection due to "Over quota"
Manual way:
If you are using Bogofilter for spam filtering, read the bogofilter FAQ.
The unix command
vacation
is used to setup automatic response to e-mail sent to you.
The "vacation" command will generate two files in your home directory:
.vacation.msg
and
.forward
The file ".vacation.msg" contains the message which will be automatically sent out. The file ".forward" activates the vacation program.
If you already have the ".forward" file, then you need to rename it since the "vacation" command will overwrite the current " .forward" file.
The followings describe the procedure:
- Enter the unix command
vacation
- The unix will give the following information:
  This program can be used to answer your mail automatically
  when you go away on vacation.
  You have a message file in /home/yourusername/.vacation.msg.
  Would you like to see it?
- Type the character "y" and the "Enter" key.
- The unix will give the following information:
  Subject: away from my mail

  I will not be reading my mail for a while.
  Your mail regarding "$SUBJECT" will be read when I return.
  Would you like to edit it?
- Type the character "y" if you want to change the default automatic response message. Type the character "n" if you want to use the default message.
- It is customary to tell people either how long you will be gone or when you plan to return.
- Do not edit the lines beginning with the text "From:" or "Subject:".
- Leave at least one blank line between the "Subject:" line and the body of your message.
- Do not remove "$SUBJECT" text from the message.
- If you type "y", then the Unix will give the following information:
  You have a message file in /home/yourusername/.vacation.msg.
  Would you like to see it?
- If you type "y" to the above question, then the Unix will give the automatic response message again:
  Subject: away from my mail

  I will not be reading my mail for a while.
  Your mail regarding "$SUBJECT" will be read when I return.
  Would you like to edit it?
- Type "n" and the Unix will give the following information:
  To enable the vacation feature a ".forward" file is created.
  Would you like to enable the vacation feature?
- Type "y" to enable the vacation feature. And the Unix will give the following information:
  Vacation feature ENABLED. Please remember to turn it off when
  you get back from vacation. Bon voyage.
Now everyone who sends you an e-mail will receive the automatic response.
If you use "dtmail", then you can setup vacation feature easily.
- At unix prompt "$" type:
/usr/dt/bin/dtmail&
- From the Option menu, select the Vacation Message... submenu.
- A dialog window will pop up. Turn on the Vacation option and other features you like.
- Click the Ok button.
Easy way:
Go to My Stuff -> Email Forwarding/Vacation Message or click here to get there.
Brower Way:
You now have new vacation tool
http://www.stat.ubc.ca/Computing/
Email forwarding and vacation message (login first)
Notes: You must Login first AND supply passwd one more time
at the bottom "Do It" button
There are 3 category
1) Remove any previously set Email vacation/forwarding
When you come back from vacation, you need to do this
2) Set up your auto-reply message
Before you go on vacation, you need to do this
3) Forward your Email to another address
If you don't want to use our email, (external mail providers: gmail, yahoo...)
You need to do this. Do not "Keep a Copy" since you need to
clean up sometime to avoid email rejection due to "Over quota"
Manual way:
To turn off the vacation feature, just re-run the "vacation" program.
- Type the Unix command:
vacation
- The Unix will give the following information:
  This program can be used to answer your mail automatically
  when you go away on vacation.
  You have a message file in /home/yourusername/.vacation.msg.
  Would you like to see it?
- Type "n" and the Unix will give the following information:
Would you like to edit it?
- Type "n" and the Unix will give the following information:
You have a .forward file in your home directory containing: yourusername, "|/usr/bin/vacation yourusername" Would you like to remove it and disable the vacation feature? - Type "y" to disable the vacation feature. The Unix will show the following information:
Back to normal reception of mail.